Friday, September 1, 2023

Paul's September 2023 Fly of the Month

 BPS Spent Caddis


Hook:  Dai-Riki 300 or standard dry fly hook in Size #14 to #18.

Thread:  Black, 8/0 or 70 Denier.   

Body:  Peacock Herl.

Wings:  Tan short/fine deer hair or elk hair, cleaned and stacked.


This fly was designed by a Fly Fisher named Dennis Kamatsu.  It is one of my top producing dry flies on the Housatonic.  When I first tied and fished the BPS, I didn’t think it would ‘out fish’ a traditional Elk Hair Caddis, but at times it’s pure magic.  There are two negative issues with this fly.  First, it rides low and flat in the water column, making it difficult to track and see the take.  Secondly, although it's comprised of only two materials, it’s not an easy tie.  It takes a little practice to separate and figure 8 the wings.      


To tie this fly, secure the hook in your vice.  Start your thread a ¼ of the way down the hook shank.  Make 5-6 securing wraps and cut off the tag end.  Take 1-3 strands of Peacock Herl (depending on the size of the fly) and tie them onto the top of the hook shank.  Wrap your thread rearward to the start of the bend.  Next, make touching wraps forward with your Peacock Herl behind your tying thread.  Stop making wraps at the ¼ mark of your thread, tie it off with 2-3 wraps of your thread and cut off the tag end.   


Next, prepare your Elk or Deer Hair wing.  Cut a ‘wing size’ clump from the hide, pull out the under fur, and stack it in a Hair Stacker.  Now, measure it on top of your hook shank so that it extends almost to the bend of the hook.  Snip the butt ends of your hair off where it aligns with the hook eye.  Move the clump a little rear work so that it now aligns with the rear of the eye.  This whole process is similar to preparing a wing for an Elk Hair Caddis.  Next, make securing wraps to bind down your Wings.  There are a number of ways to do this.  One is to make a few securing wraps and then additional wraps letting your wing rotate 1 revolution around the hook shank.  Whatever technique you use, make sure your wing(s) is bound down securely.  You are now going to separate the wing(s) into two equal halves.  Use figure 8 wraps to splay your wings.  Once the wings are splayed to your liking, use your whip finish tool to make 4-5 wraps.  Cut off your thread.  Add a drop of head cement or Hard as Nails to your thread wraps.  You’re done.

Tightlinevideo has a great instructional video on how to tie this fly below:


If you have any questions about this fly or would like to submit a Fly of The Month I can be reached at pdinice@frontier.com
.


Friday, May 26, 2023

Paul's June 2023 Fly of the Month

 Green Caddis Nymph


Hook:  Size #12-#14 or Curved Nymph Hook of Choice. 

Bead:   Black Nickel Tungsten to match hook size.

Hotspot at Rear of Fly:  Perdigon tinsel in Blue or Silver.

Thread/Underbody:  Chartreuse or Green ‘Stomach Small’ Vevus Thread.

Over-body:  Synthetic Transparent Nymph Skin or Quill coated with UV Resin

Legs:  Partridge Fibers.

Collar:  Dark Rabbit or Squirrel Dubbing.


I tied and fished a similar fly on the Housatonic & Farmington Rivers.  I did quite well with it.  This is an improved version of the fly that is extremely durable.  It’s an easy fly to tie with the one drawback, there’s not substitute for the Synthetic Transparent Nymph Skin or Quill’.  So it’s something you have to have in your fly tying supplies.

To tie this fly, place your Bead on the hook and hook in the vice.  Take 4-5 securing wraps behind the bead, then cut off your tag end.  Wrap approximately 1/3 down the bend of the hook.  Tie in your Transparent Nymph Skin or Quill.  Next tie in your Perdigon Blue or Silver tinsel.  Take 3 touching wraps forward and tie it off.  Cut off the tag end.  Now, wrap your Transparent Skin or Quill using touching wraps forward.  End it behind the bead and cut off the tag end.  Coat the body with UV Resin and cure it. 

You are now going to tie in your Partridge Fibers for legs.  Take 4-5 fibers and tie them in on one side right at the bead tie in point.  They should extend half way down the body.  Now do the same with the other side, again tying in 4-6 fibers.  Finally, you are going to dub your collar of dark Rabbit or Squirrel Dubbing.  Create a slim dubbing noodle, then wrap it approximately 3-4 times behind the bead.  Tie off your thread and cut off the butt end.  Your done.

Lucian Vasies has a great video on how to tie this fly below:


If you have any questions about this fly or would like to submit a Fly of The Month I can be reached at pdinice@frontier.com .


Wednesday, May 3, 2023

Paul's May 2023 Bonus Fly of the Month

 Tups Indespensable


Hook:  Mustad 3906B Size #12 or #14 or Wet Fly Hook of                    choice. 

Thread:  Danville 6/0 Yellow.

Tail:  Blue Dun Hackle Fibers.

Rib:  Fine Gold or Copper Wire.

Body:  Yellow Floss.

Thorax:  Pink Rabbit Dubbing

Hackle/Collar:  Blue Dun Hen Hackle.  


This is one of my favorite wet flies for suphur hatches.  It’s an old & traditional pattern that’s fairly easy to tie. 

To tie this fly, start your thread behind the eye.  Make some securing wraps and cut off the tag end.  Bring your thread down to the bend of the hook.  Prepare some Blue Dun Hackle Fibers (5-6) for the tail.  Tie them in.  They should be about the length of the shank.  After your tail is secured, advance your thread ¾ up the hook shank.  Next, tie your Fine Gold or Copper Wire, wrapping it down to the bend.  Bring your thread back up to the ¾ point where you tied in your wire.  Tie in your Yellow Floss using touching wraps as you go down to the bend.  You want to create a smooth underbody for your fly.  Bring your thread back up to the ¾ point.

Wrap your Floss forward, making touching wraps.  Tie it off at the ¾ point.  Cut off the tag end.  Now, counter wrap your Wire, using evenly spaced wraps to create a segmented body.  Tie off and cut off the tag end of your Wire.

Next, dub a thin ‘noodle’ of Pink Rabbit Dubbing for your thorax.  Usually 7-10 wraps will be enough.  Do not overdub your thorax and leave enough room behind the eye for your Hackle.  Prepare your Blue Dun Hen Hackle.  Fold back the hackle fibers leaving the tip exposed for your tie in point.  With the tip extending beyond the hook eye, and the feather lying flat on top of the shank, tie it in with securing wraps.  Once it’s tied in cut off the tip.  Using hackle pliers, wrap your Hackle.  3-4 wraps are all that’s needed.  Tie it off and cut off the tag end.  Whip finish your fly. 

Hughie Graves has a great video on how to tie this fly below:


If you have any questions about this fly or would like to submit a Fly of The Month I can be reached at pdinice@frontier.com .

Sunday, April 30, 2023

Paul's May 2023 Fly of the Month

Adachi Clouser
a.k.a. California Clouser


Hook:  Gamakatsu 291 60 degree Jig Hook Size #1/0 or Ahrex SA254. 

Thread:  Monofilament.

Eyes:  5.5 mm Dumbbell Eyes a.k.a. 3D Eyes

Tail:  Pearl Flash-a-bou.

Belly:  White or Off White Flash N’ Slinky or SF Blend Fiber.

Gills:  EP Anadromous Brush in red.

Wing:  Chartreuse Flash N’ Slinky topped with Grey or Black Flash N’ Slinky.

 This fly was developed on the West Coast.  What makes this fly something you want to put in your box?  Well, it’s tied on a jig hook and the ‘action’ is much more dramatic than that of a ‘normal’ clouser.  It is also an extremely durable fly, noted for it’s flash tail and the use of ‘artificial’ materials (Flash N’ Slinky) for it’s body. You can easily size this fly to represent any bait fish you want.

To tie this fly place your hook in the vice and mount your dubbell eyes.  The eyes should be mounted approximately a dumbbell eye length beyond the 60 degree bend to the eye.  Use figure 8 wraps to secure them.  Next, tie in 10-12 strands of Flash-a-bou for your tail.  Tie them in behind the eyes and wrap down to the tail. They should extend 4 hook shank lengths beyond the bend.  Coat & cure your eyes and hook shank with UV Resin.  You can also use Epoxy for this step.

Take a bunch of Flash N’ Slinky for your belly.  When stretched it should be  pencil lead width.  You also want to roll it between your fingers for a bit to eliminate the straight edge on your ‘cut’ end.  At the halfway point, tie it in in front of the eyes, then also secure it behind the eyes.  It should be approximately ¾ length of your flash tail.  Fold your Flash N’ Slinky over, again securing it behind your eyes.  You can use your scissors to ‘scrape’ across the end of your tail to give it a tapered outline. 

For your gills, cut a small (maybe 1/3”) of EP Anadromous Brush in Red for your gills.  Once cut, form a ‘V’ with the material.  Tie it in behind the eyes so that the fibers will extend on each side of the hook shank.  After a few ‘soft’ wraps you can adjust the gill material.  Once it’s placed where you want it, bind it down with harder securing wraps.  That completes the belly of the fly. 

You are now going to tie in your wing.  The fly’s originator says that ideally you want 2/3’rds the amount of all material on the top part of your fly.  Take the same amount of Flash N’ Slinky for your wing that you used for the belly.  Again, roll it between your fingers.  Tie it in at the half way point in front of the eyes.  You want to lay half of it on one side of the fly, and the other half on the other side of the fly.  Trim it by sliding your scissors so that it’s ¾ the length of the tail.  Finally, take and prepare contrasting color of Flash-N’-Slinky for the top of your wing.  I usually use Grey or Black to mimic Bait Fish.  Tie it in at the half way point in front of the eyes.  Then, fold it over on top of itself, trim it with your scissors so that’s it’s the same length of your other wing material.  Whip finish it and apply an adhesive to your wraps if desired.

Loon outdoors has a great video on how to tie this fly below:


If you have any questions about this fly or would like to submit a Fly of The Month I can be reached at pdinice@frontier.com .

Thursday, April 13, 2023

Paul's April 2023 Bonus Fly of the Month

 Purple Haze

Hook:  Dai Riki #300 Size 14 or Dry Fly Hook of choice. 

Thread:  Purple Uni 6/0.

Tail:  Moose Hair or Grizzly & Brown Hackle Fibers.

Body:  Purple Flexi Floss, or Purple Dubbing, or Purple Thread.

Post:  Calf Tail Fibers or Poly-yarn.

Hackle:  Moose Body hair or Brown & Grizzly hackle fibers. 

Finish:  Bottom of the fly is coated with ‘Tough as Nails’. 

This fly was developed by Andy Carlson, the owner and operator of Bitterroot Anglers in Hamilton, Montana.  To tie this fly start your thread 1/3 hook shank length behind the eye.  Take a few wraps rearward and cut off the tag end of your thread.  You are now going to tie in your tail. The original pattern calls for Moose Body hair.  I like to use Brown & Grizzley hackle fibers because in many cases I’m tying the Purple Haze in smaller sizes.  Take about 8-10 fibers and tie them in for your tail.  They should be approximately a hook shank in length.  Take wraps all the way back to the start of the hook bend and then even wraps back up to the tie in point.

Next, prepare & tie in your parachute post.  Again, because I’m usually tying this fly in smaller sizes, I’m going to use Poly-yarn instead of calf tail.  Before the tie in, it should be approximately 1 hook shank in length.  Secure it on top of the hook shank with a pinch wrap.  Now wrap rearward to secure it.  With your thread form an evenly tapered body for the fly.  Now, stand up the longer end of the Post.  Create a thread dam in front of it to lift the post.  Apply some head cement to the base of your post and take a few thread wraps around the base. 

Leave your thread in front of the post.  Prepare your Grizzly and Brown Hackles.  Snip off the stems where the fibers start to become webby.  Now strip the barbules about a ¼ of an inch on each side to give you a bare stem.  Lay the hackles together and place the stems to the near side of the fly, right behind the hook eye and across the post.  Take securing wraps with your thread.  Wrap from the eye to your post, then raise the hackle to vertical and take some securing wraps around your post.  Bring your thread back down and leave it in front of the post.  You can now wrap your hackles.  You can do that in tandem or individually, clockwise around the post.  Take wraps down to the hook shank, then tie them off with your thread.  Clip off your excess hackle, then whip finish around the hook shank or the post, which ever is your preference.  Clip off your thread and errant hackle fibers and you’re done.

I like to treat all my dry flies with High N’ Dry fly flotant, but that’s all up to you.

Tightlinevideo has a great instructional video on how to tie the Purple Haze below:


If you have any questions about this fly or would like to submit a Fly of The Month I can be reached at pdinice@frontier.com .


Sunday, March 26, 2023

Paul's April 2023 Fly of the Month

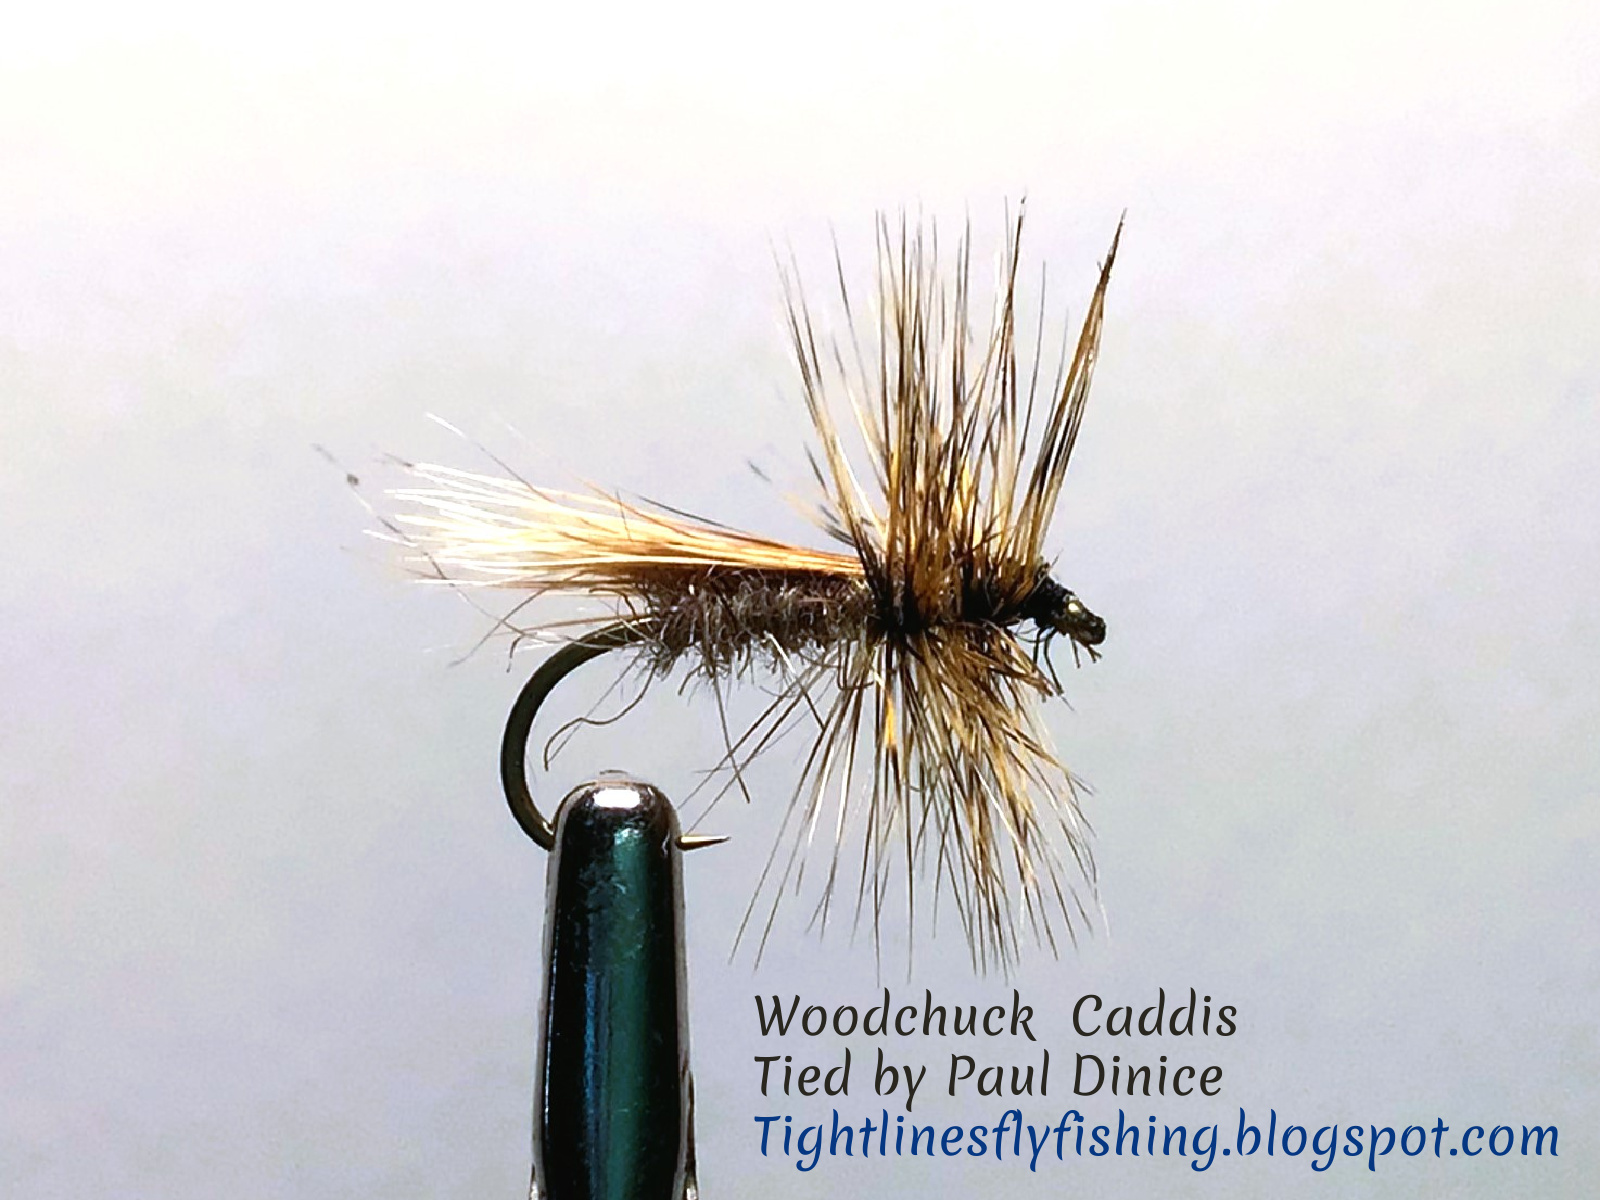
 Woodchuck Caddis


Hook:  Tiemco 100 Or Dry Fly Hook of choice; in Size #12 to #18.  

Thread:  Tan, Brown or Wood Duck colored thread.

Body:  Woodchuck under fur; or Natural Hare’s Ear dubbing mixed with Woodchuck under fur.  You may even be able to find Woodchuck dubbing.

Wing:  Woodchuck guard hairs.

Hackle:  Brown and Grizzly; or a single Cree; or dark-barred Dun Hackle.  

Eric Leiser is credited with having popularized this fly.  He included it in his book ‘The Book of Fly Tying Patterns’.  It’s a pretty easy tie and you can knock a lot of these flies fast.  It requires only 3 all natural materials.  This fly has been around for a while.  I have to thank my friend Bill Goeben for introducing it to me more than 35 years ago.  

To tie this fly, secure the hook in your vice.  Start your thread on the hook shank leaving a 2 hook eye length space behind the hook eye.  Take a few securing wraps ‘rearward’ then cut off the tag end.  Wrap rearward so that your thread hangs at about the hook point.  Next, create a slender dubbing noodle with your Body dubbing of choice.  Start dubbing the hook shank at the bend and make ‘touching’ wraps forward to the initial tie in point.  You are now going to prepare your wing by clipping a small clump of Guard Hairs off of the Woodchuck hide.  Pull away the shorter ‘underfur’ from the Guard Hairs.  You can use it for Body dubbing if you want.  Take the Guard Hairs and place them ‘tips first’ into a hair stacker.  Stack the hairs then measure them on top of the hook shank.  It should extend slightly beyond the back edge of the hook bend.  Hold the hairs tightly and make securing wraps forward.  Now lift the butt ends of the hairs off and trim them off.  Continue making securing wraps forward to the hook eye.  Bring your thread back to the initial tie in point. 

Select a Brown and Grizzly hackle for the fly.  A Cree or dark-barred Dun Hackle will also work.  Strip the fuzzy base feather fibers.  Now lay the feather on the near side of the hook.  The feather fibers should be forward beyond the hook eye and the stem will lay the hook shank.   After it is securely anchored, cut off the butt end of the feather and create a secure base for your hackle.  Leave your thread at the initial tie in point.  Now, wrap your hackle back to your thread with your pliers.  Take a few securing wraps around your hackle feather.  You are now going to make ‘touching’ wraps forward, carefully making counter wraps through your hackle, all the way to the hook eye.   Whip finish the fly, then cut off the butt end of  your hackle feather and your done. 

Below is a video by tightlinevideo on how to tie this fly:


If you have any questions about this fly or would like to submit a Fly of The Month I can be reached at  pdinice@frontier.com .

Friday, March 10, 2023

Paul's March 2023 Bonus Fly of the Month

 Krap Nymph


Hook:  1x long nymph hook Size #14 & 16. 

Thread:  6/0 Tan.

Bead:  Copper Tungsten Bead Sized to match hook.

Weight:  (Optional) 8 to 10 wraps of .025 Lead.

Tail:  Olive-ish, Brown or Red-ish Krap Dubbing.

Rib:  Small Copper, Gold, or Red Wire.

Body:  Olive-ish, Brown or Red-ish Krap Dubbing.

Thorax:  Olive-ish, Brown, Red-ish or Black-ish Krap Dubbing. 

Wing Case:  (Optional) Black or clear Bug or Nymph Skin; Coated with UV Resin.

Hot Spot:  (Optional) Wraps of Red, Orange, or Chartreuse Thread

This nymph is gnarly, buggy, and an easy tie.  I don’t usually post flies of the month with a very specific material.  This dubbing material is made by Fly Tyers Dungeon.  It’s a conglomeration of every wet fly dubbing you can think of.  There’s rabbit hair, ice dub material, and a lot of squiggly little bug legs in the mix.  I’ve had great luck with this fly.  You don’t have to purchase it from FTD (although their prices are super reasonable, they are great to deal with, and are super fast with your order).  If you don’t order the material from them, as a tyer, what you should do, is experiment with, and field test, different dubbings that you mix up yourself.  I tie this nymph in Olive, Brown, and with a Red tint. All these colors work.

To tie this fly begin by placing your bead on the hook.  Next, take 8-10 wraps of lead around the hook shank.  Push the wraps tight against the bead.  Trim off the butt ends of the lead wire.  Start your thread immediately behind the lead wraps to lock them in place.  Then, cover the lead and wrap your thread down to the hook bend.  Try to shape your thread wraps to create a tapered underbody.  Now tie in your Wire Ribbing.  I usually tie mine onto the far side of the hook.  I find it helps  prevent the first wrap of ribbing fowling the tail of the fly.  Next, form a thin dubbing noodle with your dubbing.  Dub the first 2/3rds of the fly.  Now wrap your ribbing forward to create a segmented body.  Tie it off with your thread and ‘helicopter’ the wire butt end off the hook shank.  Next, dub your thorax.  End and whip fishing your thread behind the bead.  If you like, you can create a ‘hot spot’ with wraps of Red, Orange, or Chartreuse thread.

A video by FTD on how to tie the Krap Nymph, is shown below:   


The website for Fly Tyers Dungeon is https://www.flytyersdungeon.com/index.htm  

If you have any questions about this fly or would like to submit a Fly of The Month I can be reached at pdinice@frontier.com .