Tuesday, December 18, 2018

Paul's January 2019 Fly of the Month

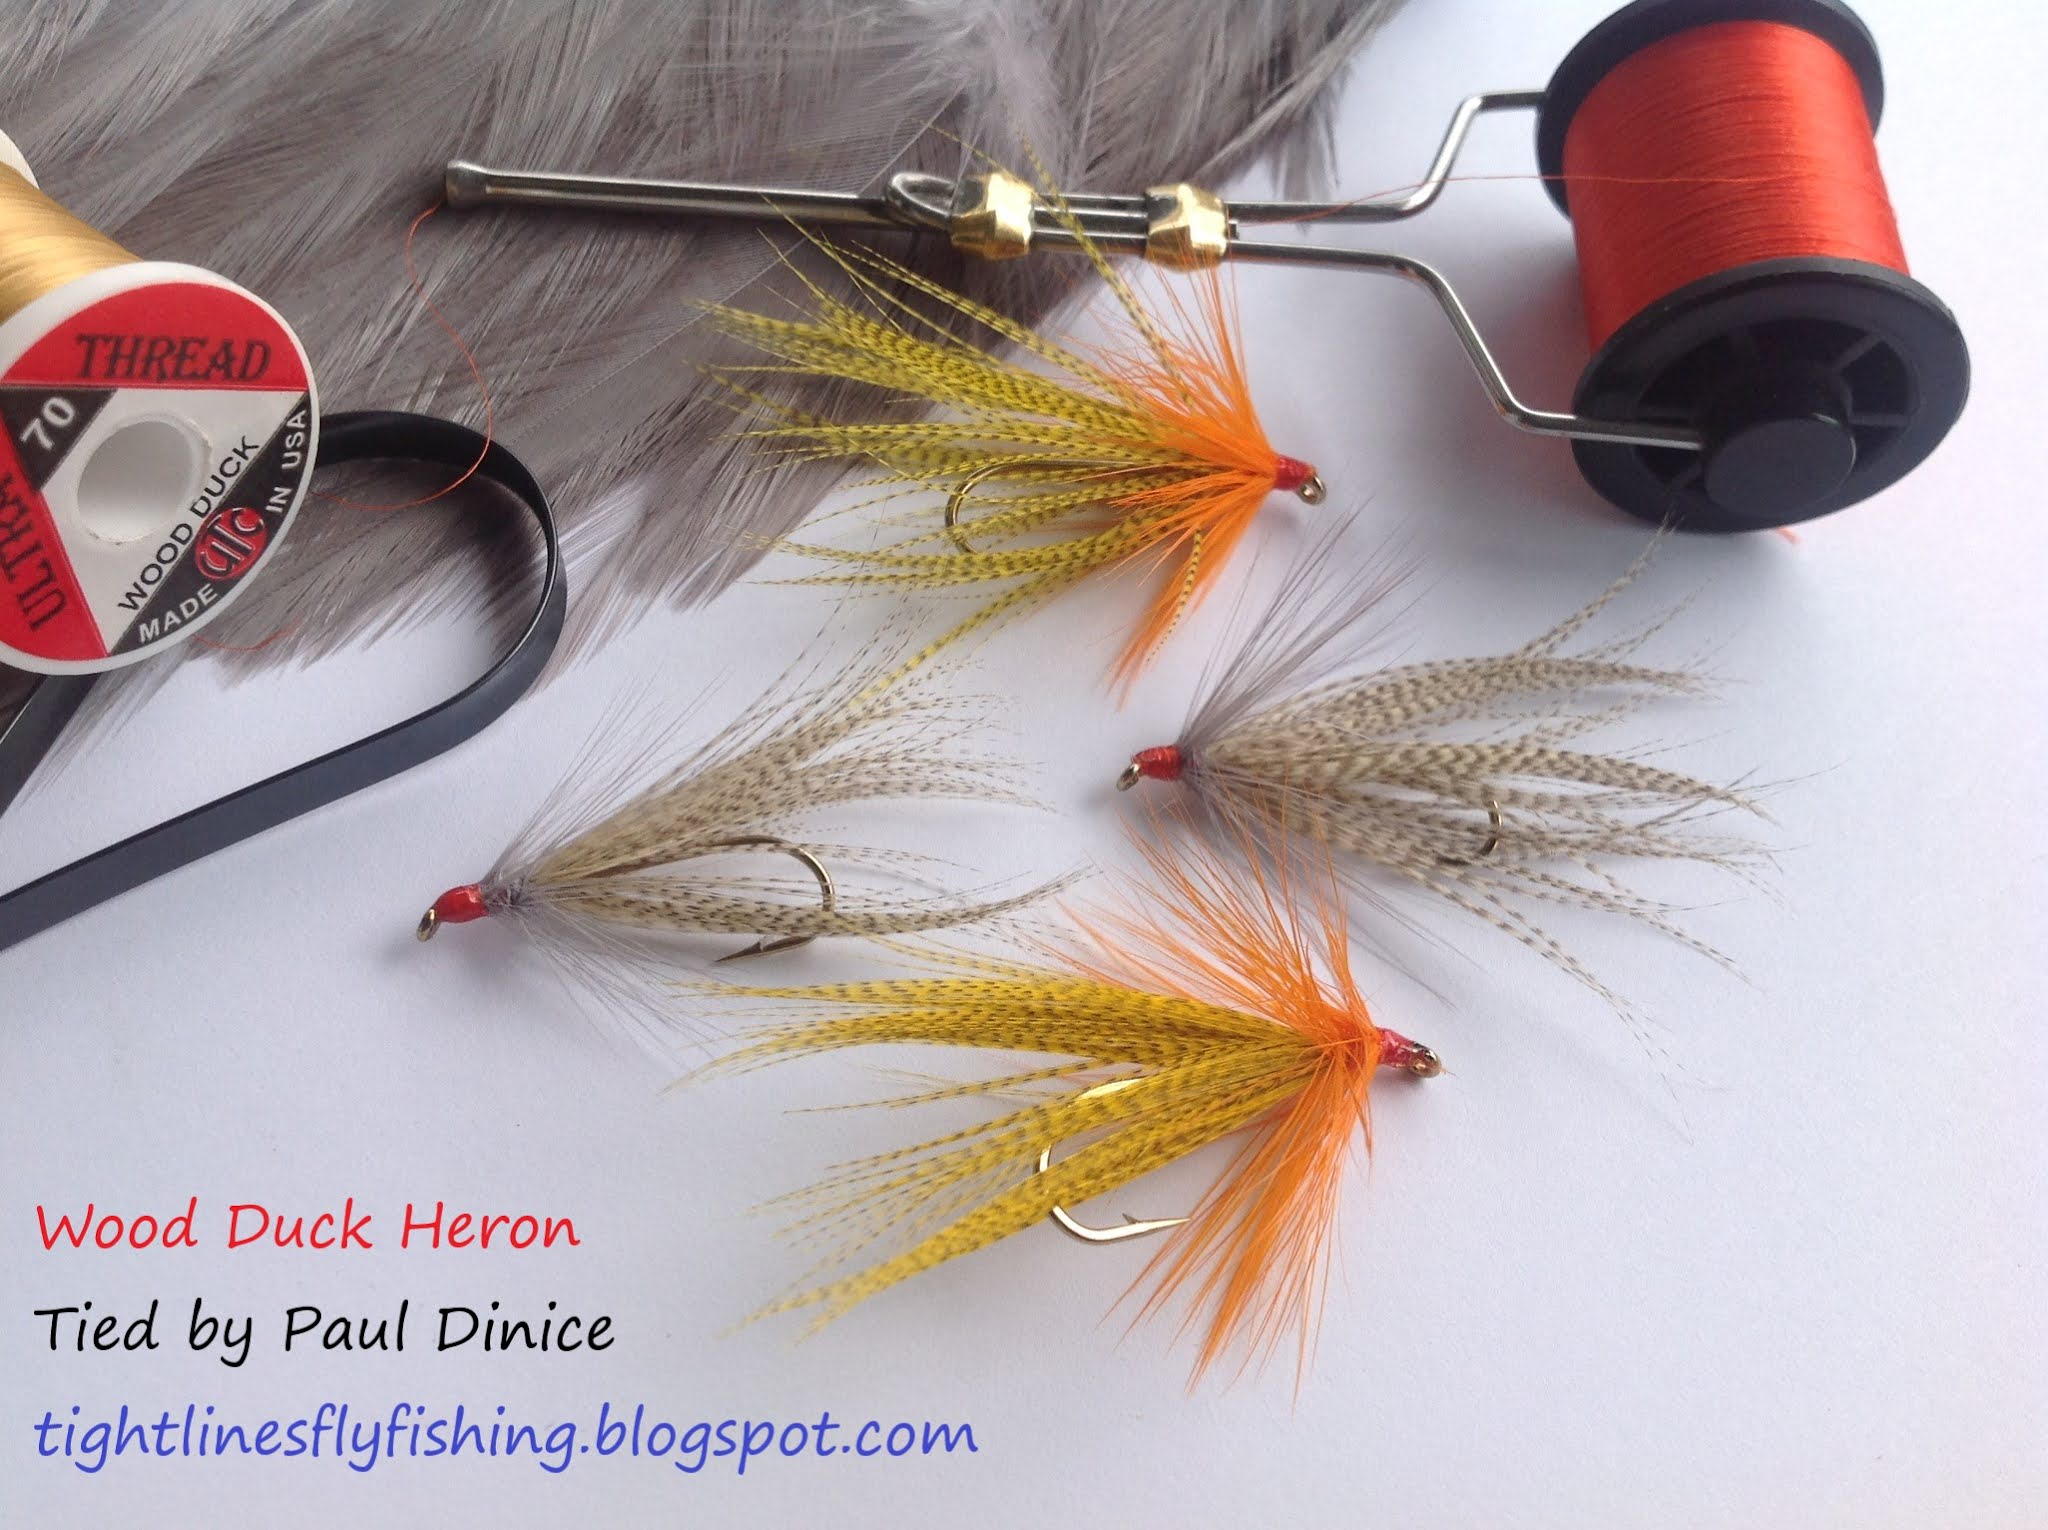
Reece's Masked Bandit

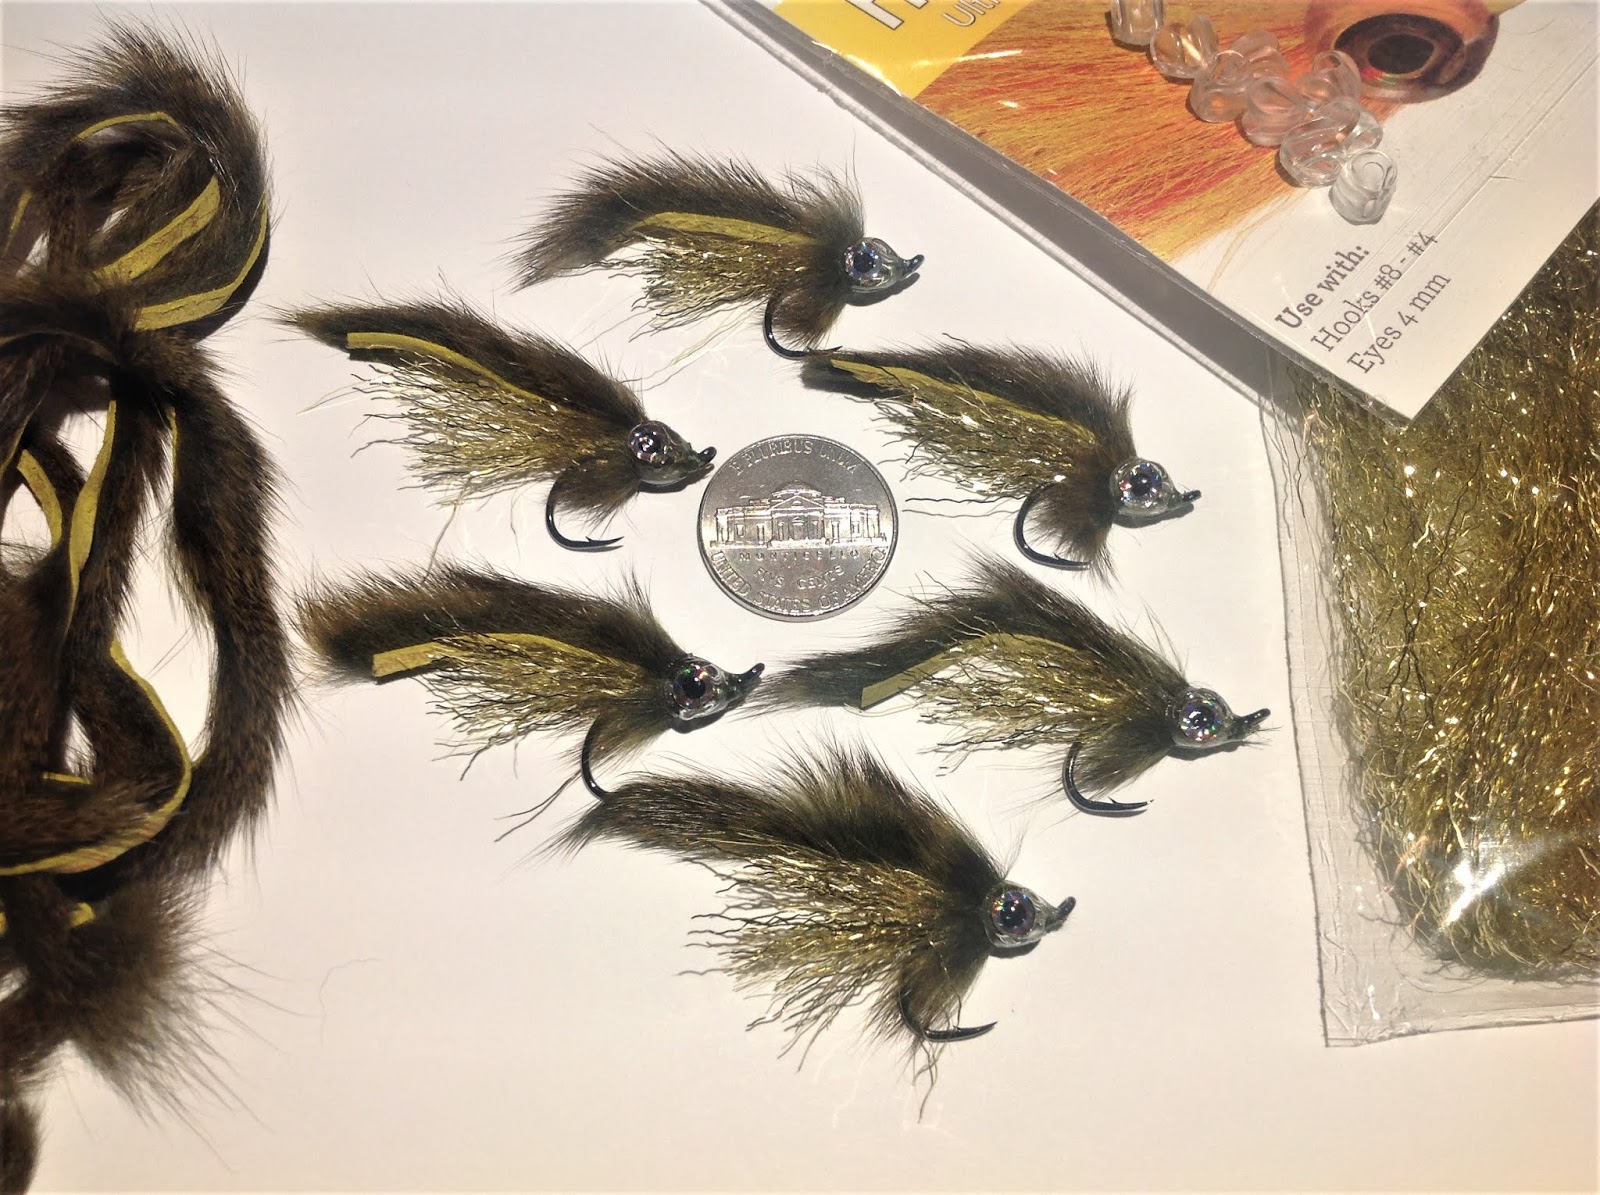
Hook:  Size #4 Gamakatsu Octopus hook.
Tying thread:   6/0 to match color of squirrel. 
Flash:  Hairline Gold Ripple Ice Fiber.
Tail/Wing:  Pine Squirrel Zonker (Olive, Black, Orange & Natural).
Collar:  Pine Squirrel Zonker.
Head:  4mm Flymen Fish Mask, 4mm Living Eyes.

In the age of big and gaudy articulated streamers, this pattern is an alternative to try and represent smaller forage fish in rivers & streams.  It was developed by Mr. Bob Reece of Wyoming.  He believes that this pattern is very effective because of its tapered head and large eyes.  These are predominant features of shiners, chubs, & dace.  I love fishing small streamers.  This is one of my go to patterns that I’ve found to be very productive.  You can tie it in a variety of colors.  Olive is my preferred color. 

Begin by laying a base of thread from the hook eye to where it hangs evenly with the hook point.  Add a few drops of adhesive and tie in a clump of Gold Ripple Ice Fiber.  After is it is tied in, cut it to approximately 2 hook shank lengths.  Cut it on a 45 degree diagonal from right to left.  Next, tie in your squirrel zonker strip.  It should be approximately 2 ½ times the length of the hook shank.  It is tied in only by the tip of the strip.  Next, tie in a second strip of squirrel zonker to be used as a collar.  Before you tie it in, clip the tip at a 45 degree angle.  That will provide you with an easier tie in point and make wrapping your collar easier.  Add a few more drops of adhesive and wrap your zonker forward to create your collar.  One or two wraps is all that is needed.  Tie off your zonker collar, whip finish, and clip off your thread.  You are now ready to place your fish mask and eyes onto the fly.  The fly designer recommends gluing and affixing the eyes on the mask prior to putting it on the hook shank.  I use Fusion glue to cement the eyes in place, then use a little light activated resin on them, with a final coat of ‘Tough as Nails’ for added durability.  Add some adhesive on the hook shank behind the eye prior to gluing in the mask.  When you place the mask on the hook shank, leave room in front of it for additional thread wraps to ensure it is held in place.  After you build up wraps in front of the mask, clip and whip finish it off.  Apply additional adhesive to the wraps. 

Bob Reece has an excellent instructional video on how to tie this fly below: 


If you have any questions about this fly or would like to submit a Fly of the Month I can be reached at 203 305-3850 or at pdinice@frontier.com .  

Wednesday, November 14, 2018

Paul's December 2018 Fly of the Month

The Baymen Universal


Hook:  Eagle Claw 254 SS or Eagle Claw L253 (Size #4 to #2/0 hook.)
Tying thread:   Danville Flat Waxed Nylon, color of choice. 
Wing:  6-8 strands of Peacock Herl over Olive Bucktail over Pearl Krystal Flash over Pink Bucktail.
Belly:  White Bucktail.
Throat/Gill:  Red Bucktail.
Eyes:  3D Living Eyes sized to fly (I like to oversize my eyes).
Finish:  5 Minute Epoxy or UV Resin.

This is an extremely versatile salt water fly.  I’ve tied it on size #4 to #2/0 hook sizes.  What’s important about this fly are the various colors in the pattern recipe.  The pink & olive color combo is a striper magnet.  The fly also includes a flash lateral line, 3 D eyes, and a red ‘throat/gill plate’, all triggers that make this a very productive fly.  A few years ago I was on the Cape and the fish were feeding on very small bait fish.  I had tied up a bunch of Universals on a size #4 hook (I also coated the body along the hook shank with epoxy) and landed fish after fish when others failed to.  This is a very easy and fast tie once you get rollin’.  No feathers to pair or mess with.  One additional comment about tying this fly, sparse is better. 

Begin by laying a base of thread from the hook eye to the bend.  Bring your thread back up to the eye.  Tie in a sparse clump of pink buck tail behind the hook eye.  It should extend beyond the bend at least 2 times the length of the hook shank.  Next, in the same location. tie in a generous amount of Pearl Krystal Flash just slightly longer than the pink buck tail.  For very small flies I’ve substituted silver holographic tinsel for Krystal Flash.  Next, top the flash with a clump of Olive Buck Tail just slightly longer than the rest of the wing.  Now, top it with 6-8 strands of Peacock Herl longer than the length of the entire wing.  Your wing is complete.  Don’t forget to increase the durability of your fly by applying some head cement (or adhesive of choice) as you tie it. 

If you have a rotary vice your going to rotate your fly to tie in your belly.  On the opposite side of the hook where you tied in your wing, your going to tie in a clump of White Buck Tail for the belly.  It should extend to the approximate length of your wing.  Remember not to over dress the fly.  You’re now going to tie in your ‘throat/gill plate’ comprised of Red Buck Tail.  It’s tied in just under the belly and extends approximately a hook shank length under the belly.  Finally, it’s time to tie in your 3 D living eyes.  Some like to use goop or zap-a-gap to affix them.  I prefer to stick them on and then epoxy over them for additional durability.  As always, feel free to experiment with this fly.  Try different flash materials or even colors.  One thing you want to do is tie it in variety of sizes.

Dave Bitters of Baymen Charters has an excellent instructional video on how to tie this fly below:


If you have any questions about this fly or would like to submit a Fly of the Month I can be reached at 203 305-3850 or at pdinice@frontier.com .  

Friday, October 19, 2018

Paul's November 2018 Fly of the Month

Carey Special


Hook:  3X long Nymph hook. (Size #6 to #10 hook.)
Tying thread:   Black 6/0 or 140-denier thread. 
Weight (Optional):  6-8 wraps of lead free wire or a brass or tungsten bead.
Collar:  Gold Utra Wire, small  (Or use color of choice.)
Tail:  Speckld Golden Olive Coq de Leon fibers or Pheasant rump feather fibers.
Body:  Brown-olive rabbit-fur dubbing. (or peacock herl or chenille).
Thorax:  Brown-olive SLF dubbing.
Hackle:  Speckled Golden Olive Coq de Leon Feather or Pheasant rump feather fibers.
Head:  Tying Thread.

Kudos to my fly fishing friend Mike Lombardo for reminding me about this fly.  I had tied it many years ago but alas, it’s a forgotten fly in one of my boxes.  So glad he reintroduced it to me again.  This pattern was originally developed in the Canadian West.  It was created by a gentleman by the name of Dr. Loyd A. Day of British Columbia back in 1925.  It’s an old & traditional fly that works both in still water & rivers.  Although it can represent a variety of fish foods, it’s best known as a damselfly & dragon fly imitation.  Numerous material substitutions can be made to tie this pattern.  I’ve offered some of these alternatives in the recipe above.  When tied in bright colors it’s a much used steelhead fly.

Begin by starting your thread behind the eye of the hook.  (If you so desire you can add weight to the hook or slide a brass or tungsten bead behind the eye.)  Wrap it to the bend of the hook.  At the bend of the hook tie in approximately 6-12 Coq de Leon fibers (or use pheasant flank fibers) for your tail.  The length of the tail should equal the length of the hook shank.  Next, tie in your gold ultra wire rib.  You’re now going to dub your body of Brown-Olive rabbit-fur dubbing.  Leave enough room behind the eye for your Thorax and hackle.  Bring and wrap your rib forward to create an even segmented body.   Tie & clip off the wire.  Next, dub your Thorax with Brown-olive SLF dubbing.  Next, select a Coq de Leon feather (or pheasant flank feather) for your hackle.  The fibers of the feather should be at least a hook shank in length.  Strip the bottom of the feather stem before tying it in.  Sweep the fibers of the feather back and make two (2) wraps of the feather.  Tie and cut the excess feather off.  Create a finished bulbous head on the fly.  Cut your thread and apply head cement. 

As previously stated you can make numerous material substitutions with this pattern.  A much used version has a body made of peacock herl (see picture above).  Another alternative is to create the body by wrapping chenille.  The variations & colors are endless.

Tight line has an excellent instructional video on how to tie this fly below:

If you have any questions about this fly or would like to submit a Fly of the Month I can be reached at 203 305-3850 or at pdinice@frontier.com .  


Friday, September 21, 2018

Paul's October 2018 Fly of the Month

Wood Duck Heron Fly

a.k.a. the Wood Duck & Orange


Hook:  2X to 3X long Nymph/Streamer hook. (The size of your wood duck will dictate your hook size.  I usually tie mine on a Size #6 or #8 hook.)
Tying thread:   6/0 or 8/0 thread.  Color of choice.  (I usually tie mine with UTC wood duck or fluorescent orange thread.)
Wing:  Natural Lemon Wood Duck or dyed imitation.
Collar:  Light Dun Hen neck or saddle hackle.  (Or use color of choice.)

This streamer is a regional favorite of New Hampshire.  It was originally developed by Mr. Nick Lambou of Manchester, New Hampshire.  Only 4 materials are needed to tie it, hook, thread, wood duck, & hen hackle.  A simple tie that really produces.  When tied with an Orange collar it’s known as the Wood Duck & Orange, a particularly effective fly for steelhead & land locked salmon, as well as trout.  In the streamer age of ‘Bigger is better’ & ‘Articulated is best’, I’ll take this smaller traditional pattern any day!

To tie this fly, begin by wrapping your thread behind the eye to approximately the half way point of your hook shaft.  Make sure the wraps are even.  That will help when your wood duck and collar are wrapped.  Next select a wood duck feather.  It should be long enough to extend about ½ hook shank length beyond the bend.  Your going to stroke the fibers of the feather back and tie it in at the middle of the hook shank by the tip.  Preen the fibers back so that both sides are married and pointing back to the bend of the hook.  With a set of hackle pliers palmer/wind the feather forward, stroking back the fibers with your free hand as you go.  Bring the feather forward and tie it off, but make sure you leave room behind the eye for your collar. Next select a dun hen feather to use for your collar.  Just as you did with the wood duck, stroke the fibers back and tie it in by the tip.  Preen the fibers back so that both sides are married and pointing back to the bend of the hook.  With a set of hackle pliers palmer/wind the feather forward, stroking back the fibers with your free hand as you go.  You want to form a nice collar.  It should take 4-5 wraps.  Now, tie off and clip the feather.  Next, form a neat head with your thread behind the eye.  Apply some head cement & your ready to fish your creation.

Below is an excellent video on how to tie this fly from Stone River Outfitters:

If you have any questions about this fly or would like to submit a Fly of the Month I can be reached at 203 305-3850 or at pdinice@frontier.com .  


Friday, August 24, 2018

Paul's September 2018 Fly of the Month

Cruncher Hot Spot Pheasant Tail 

Hook:  Nymph hook; or curved nymph hook of choice size #12 to #18.
Bead:  (Optional) Gold bead or bead of choice to match the size of hook. 
Tying thread:   Black 8/0 thread.
Tail:  Dyed Black Pheasant tail fibers.
Rib:  Copper - small wire.  I like to use red wire.
Abdomen:  Wrapped Pheasant tail fibers.
Thorax/neck:  Red Holographic Tinsel.
Hackle/legs:  Dyed Black Partridge or Dyed Black Hen Hackle.

This is yet another variation of a pheasant tail nymph.  The advances in fly tying materials in recent years is truly remarkable.  You can easily purchase Pheasant Tail Feathers dyed in a variety of colors.  Although this pattern is effective all year long, it is deadly when if it is fished during the ‘early black stone hatch’ in late winter and early spring.  You can tie this fly on a curved nymph hook, with or without a bead, and with Partridge or Hen for the hackle.

To tie this fly, begin by wrapping the shank of the hook with your thread.  (I have also tied this pattern with a bead and more as a deep water nymph.)  Tie in three (3) Pheasant tail fibers for the tail.  They should be roughly a hook shank gap in length.   Tie in your small copper wire rib.  Next, depending on the size of the fly, tie in 2-4 more pheasant tail fibers by the tip.  Wrap them forward approximately 2/3rds down the hook shank to form the abdomen.  Tie and clip the excess off.  Counter rib your fly with the wire.  Tie and clip it off.  Next, for your hot spot, tie in your Holographic Red Tinsel.  You are going to wrap the tinsel to create a ‘hot spot’ on your fly.  To increase durability, you may want to dab a drop of head cement to the hook shank prior to wrapping it.  Give the tinsel 3 turns around the hook shank, then tie and clip it off.  Between the ‘hot spot’ and the hook eye (or bead) there should be enough room to tie in and wrap your hackle.   If I want a traditional wet fly profile I use Partridge.  For smaller or nymph type variations I use Hen Hackle.  After tying in your hackle of choice, take 2-3 wraps around the hook shank, stroking the feather fibers back while your wrapping.  Tie and clip the hackle off.  Whip finish your fly and apply some head cement.

There is an excellent video on how to tie this fly which was posted By Mak below:

If you have any questions about this fly or would like to submit a Fly of the Month I can be reached at 203 305-3850 or at pdinice@frontier.com .  

Monday, May 21, 2018

Paul's June 2018 Fly of the Month


Quasimodo Pheasant Tail


Hook:  Tiemco 2488 or curved nymph hook of choice size #14 to #20.
Bead:  Gold bead or bead of choice to match the size of hook.  A slightly over oversized bead is needed for this pattern.
Tying thread:   Brown UTC 70 or thread of choice.
Tail:  Pheasant tail fibers.
Rib:  Copper small wire.
Abdomen:  Wrapped Pheasant tail fibers.
Thorax:  Peacock Herl.
Flash back/Wing case:  Pearl Flashabou or pearl tinsel.
Legs:  Pheasant tail fibers.

Sometimes slight variations in the material and/or the profile of a fly can make a difference in enticing a fish to bite.  This fly is really a traditional Pheasant Tail Nymph with three (3) small variations.   First, it’s tied on a curved short shank hook rather than straight hook.   Secondly, the bead on the Quasimodo is slightly oversized.  Finally, the wing case consists of  Pearl Flashabou or pearl tinsel instead of Pheasant tail fibers.  I like to tie the Quasimodo’s as small as possible.  It is one of my ‘go to nymphs’ on the Farmington River.  There has been a great development with regard to Pheasant Tail fibers in the last 4-5 years.  YOU CAN BUY THEM IN DYED COLORS.  My two favorite colors are orange & olive. 

To tie this fly, begin by placing a slightly oversized bead on your hook.  The recipe calls for a gold bead, but I often use copper or sometimes black.  I believe it’s good to change up your bead color on a heavily fished tail water like the Farmington.  Also, because these flies are so small, adding lead is impossible.  To get them down I make sure I use a tungsten bead.  Next, wrap the shank of the hook with your thread.  Tie in three (3) Pheasant tail fibers for the tail.  They should be roughly a hook shank gap in length.   Tie in your small copper rib.  If I’m tying my fly in dyed orange pheasant tail fibers, I might use red wire.  If I’m tying the fly in olive, I might use chartreuse.  Next, tie in 1-3 more pheasant tail fibers by the tip.  Wrap them forward approximately 2/3rds down the hook shank to form the abdomen.  Tie and clip the excess off.  Counter rib your fly with the wire.  Tie and clip off.  You are now going to tie in approximately six (6) pheasant tail fibers for your legs (just like a standard pheasant tail nymph).  The tips should extend beyond your bead.  Ultimately, you are going to fold them back for your legs.  Measure them carefully for the proper leg length.  Trim and cut the butts.  Next, tie in 1-2 strands of pearl flashabou for your wing case.  Next, tie in 1-2 strands of peacock herl for your thorax.  Wrap the peacock herl forward and tie it off behind the bead.  Next, bring your flash/wing case forward and split your legs.  Tie & clip it off behind the bead.  When you tie it off you must fold your ‘legs’ back.  Secure and position them with additional wraps.  Whip finish and clip off your thread. If you like ad a dab of head cement to your wraps.

In The Riffle has a great video on how to tie this pattern below:


They also have a great website at    http://intheriffle.com . 

If you have any questions about this fly or would like to submit a Fly of the Month I can be reached at 203 305-3850 or at pdinice@frontier.com .

Thursday, April 26, 2018

Paul's May 2018 Fly of the Month

Paul's Hair Bug

Hook:  Mustad #34011 (SW) size # 1/0 or 2/0 or preferred long shank hook.
Tying thread:   Salt Water grade thread such as Danville’s Flat Waxed Nylon, Big Fly Thread, or GSP.
Tail:  Small bunch of pencil size white buck tail extending 1 ½ times the length of the hook shank from the bend of the hook, over which is 4-6 white saddle hackles tied in deceiver style, topped by a small amount of white buck tail extending ¾ the length of the tail.
Body:  3 to 4 wraps of Bill’s Body Braid or metallic braid material of choice.  Just make sure that whatever you use is durable.  The body material should extend from your tail tie in point and cover 2/3rds the hook shank, leaving the last 3rd of the fly exposed.
Flash:  6-8 strands of Silver Holographic Tinsel.
Belly:  White Deer Hair tied in at the end of the body wrap.  It should extend to approximately ½ the length of the tail.
Cheeks:  On both sides of the hook shank tie in equal parts of chartreuse deer hair extending approximately ½ the length of the tail.
Wing:  Chartreuse deer hair extending approximately ½ the length of the tail.  (Belly, cheeks, and wing are all the same length.)    
Head:  Spun Chartreuse deer hair trimmed to a sedge shape (muddler head).  After trimming the head dab liberal amounts of head cement all over it to increase durability.  

This is one of my top 5 salt water flies.  Not only does it catch great numbers of fish, it is a “big fish” catching fly!  There is not much original about this fly but I’m still calling it Paul’s Hair Bug.  I have done a lot of reading about very similar such as the Black Angus & Snake fly.  Both have deer hair heads and are great flies.  The heads push a lot of water and the ‘movement’ of these flies really entices fish to bite.  One thing I have never read about is one technique that I use to fish this fly.  Many times I’ve fished over very deep ‘cuts’ at river mouths or in estuaries.  These are prime spots and there are usually a few other fly fishermen fishing there.  Almost all are using intermediate lines.  At times they may be catching some stripers but I know that at these locations most fish are located in the very lower portion of the water column.  So I fish a sinking line, maybe a 250 to 350 grain.  A possible problem is that you may now be getting your fly down to the fish, but standard flies such as deceivers and even clousers, tend to hang up if your fly is all the way down on the bottom.  By using a ‘Hair Bug’ your fly is so buoyant it stays 1-3 feet above the bottom, but still within strike distance to the fish.  It also moves side to side like a spin fisherman’s bomber lure and up and down between strips of the fly.  This technique has let me catch stripers when others could not get their flies within striking distance to the fish.

When tying this fly, think of it as a deceiver on steroids with a deer hair head.  Begin by tying in your white buck tail at the bend of the hook.  This helps to prevent the fouling of the saddle hackles you are going to tie in next.  Tie in 4-6 white saddle hackle deceiver style.  Now take a smaller amount of white buck tail and tie it on top.  Before you really bind it down use your finger nail by pressing against it to envelope the saddle hackles.  Next, tie in your body braid material.  Wrap it forward and tie it off leaving the final 1/3 of the hook shank exposed.  This will assist you in spinning your deer hair head later.  Now tie in 6-8 strands of Holographic Silver Tinsel.  The tinsel should extend to the tip of the tail.   Next, tie in equal lengths of White Buck Tail for the Belly, and Chartreuse Buck Tail for the Cheeks and Wing.  Now spin your deer hair (belly hair) muddler head on the fly.  The key to spinning a good deer hair head is to hold the hair in place for 1 1/2 tight wraps, then letting it go for your second and third wrap. Continue this process by pushing as much spun hair back towards the bend of the hook that you can. You want a very full spun head.  After you reach the eye of the hook, tie off your fly.  Now it’s time to trim the head.   When you trim it, clip the bottom of the head flat with a scissors or razor blade.  Trim the top into a round shape tapering down to the hook eye.  After trimming the head, place some head cement on your bodkin and dab it onto your head for greater durability.  

If you have any questions about this fly or would like to submit a Fly of the Month I can be reached at 203 305-3850 or at pdinice@frontier.com .  


Wednesday, March 14, 2018

Paul's April 2018 Fly of the Month

Paul's Everything Hare's Ear Nymph


Hook:  TMC 102Y Size #13 hook.  This is a black hook in ‘off’ sizes.  Or just use any preferred nymph hook.

Tying thread:  Black or brown thread.  Collar hot spot of fluorescent orange thread.

Bead:  Tungsten 3.0 mm copper bead.

Weight:  Optional.

Tail:  Barred Wood Duck or dyed Mallard flank feathers.

Rib:  Red ultra wire ‘Brassie Size’.

Abdomen:  70% Hare’s Ear (sheared from mask), mixed with 10% gray squirrel, mixed with 10% Hare’s Ear Antron dubbing, and mixed with 10% assorted Ice Bub/Prism Dubbing (browns, tan, gray, olive-brown).  This blend was developed by Torrey Collins. I first posted it for tying Torrey’s Bead Head Hares Ear Caddis (found elsewhere on this blog).

Thorax:  Tan Ice Dub.

Collar:  2-3 wraps of Dun CDC feather.

Hot Spot:  Fluorescent Orange thread.    

I’ve said this a lot lately for recent ‘Fly of the Month’ patterns, “there is nothing original about this fly”.  I’ve stolen, borrowed, and copied the components of this fly from patterns.  I’ve tweaked and used alternative ingredients that differ from a traditional Hare’s Ear.  What led me to these changes?  Quite honestly, I never did all that well fishing a traditional Hare’s Ear Nymph.  I started fishing this pattern last year and now it’s an indispensible fly in my box. 

Begin by placing your copper tungsten bead on your hook.  Add 5-6 wraps of lead behind the bead if you so desire.  Start your thread behind the bead, cover you lead wraps and hook shank to the bend.  Tie in your wood duck or mallard fibers for your tail.  They should extend approximately the length of the hook shank beyond the bend.  Next, tie in your red wire rib.  Dub the abdomen leaving approximately 1/3 of the hook shank behind the bead.  You will need this remaining area for your thorax, collar, & hot spot.  Next, rib the abdomen with your red wire.  Tie and clip it off.  Dub your thorax with Tan Ice Dubbing.  Behind the bead tie in a Dun CDC feather by the tip.  Give it two wraps around the hook shank then tie it off and clip the butt end. Assuming you are tying this fly with black or brown thread, tie & clip it off.  Now affix your Fluorescent Orange Thread behind the bead, forming a ‘hot spot’ behind the bead.  Tie & clip off the thread.  Apply some head cement to your orange hot spot. 

If you have any questions about this fly or would like to submit a Fly of the Month I can be reached at 203 305-3850 or at pdinice@frontier.com . 

Friday, February 16, 2018

Paul's March 2018 Fly of the Month

Monahan's Mangum Dragon Fly


Hook:  Gamakatsu B10S size #1/0 or hook of choice.

Tying thread:   Flat waxed tying thread or heavy tying thread of choice.  Color to match dragon tail.

Tail:  Mangum dragon Tail.  This is an Orvis product now carried by numerous fly shops.

Foul Guard:  50lb. test mono.

Body:  Cross Cut rabbit strip.

Collar:  ‘Bait Fish Emulator’ flash.

Head:  Fish Skull Mask #7 with 7 mm eyes.

Adhesive:  Tip of tail should be treated with super glue, ‘fusion glue’ or adhesive of choice.  It is also needed to glue the ‘mask’ to the fly. 

 You want a big fish fly that’s easy to tie.  Well this is it.  I first started using this fly last fall.  I only fished it in white but will be trying additional colors this spring.  
It’s easy to tie & cast.  I’m calling this fly the ‘Monahan Magnum Dragon’.  The recipe and tying instructions are based upon my friend Fred Monahan’s submission.  Fred is an HFFA member who is also very active in Cape Cod Trout Unlimited.  I know he is really looking forward to using this fly on the Cape. 

Begin by winding a layer of thread from the eye of the hook to the hook bend.  Next take a length of mono and crimp the ends flat. You are going to tie it in at the hook bend to create a horizontal foul guard. It should extend approximately 1 ½” from the hook bend.  After tying it in you might want to use an adhesive of choice for durability.  Next tie in your mangum dragon tail starting at the bend of the hook.  You can shorten the tail by simply clipping it if you like.  The species I’m going after with this fly are stripers.  I see no need to shorten the tail for them.  Some do use this fly for other species such as fresh water bass and you may want to reduce the length of the fly.  Also, for durability apply some super glue or fusion to the very tip of the tail. I have had an issue of the tail materials unraveling with heavy use.  You also have the option of applying a drop of super glue to the end of your foul guard and gluing the tail to it.  With your tail tied in near the bend attach your rabbit strip and give it a few wraps forward to create the body.  Tie and clip it off.  Now tie in your collar of ‘Bait Fish Emulator’ flash.  Give that a couple of wraps.  Tie & clip it off.  Your next step is to build up a fly head so that the fish mask will fit snugly onto the hook.  I usually take a few test mountings prior to affixing the Fish Mask.  Once you’re sure that it will fit properly, apply some fusion glue or adhesive of choice to the fly head.  Slip on your Skull Mask.  Use your thread to make a couple of wraps in front of the Mask. Tie off your thread.   Apply an adhesive to those wraps as well.  Apply your eyes to the Fish Mask.  Glue them in with adhesive, epoxy, or UV resin.   

You can see what great action this fly has in the water in the video below: 

If you have any questions about this fly or would like to submit a Fly of the Month I can be reached at 203 305-3850 or at pdinice@frontier.com .  

Wednesday, January 31, 2018

Presentation on Winter Fly Fishing March 7, 2018 - New Date

Naugatuck-Pomperaug Trout Unlimited
Ion Bank Community Center Building
270 Church Street
Naugatuck, CT 


Due to inclement weather in February, This presentation will take place on Wednesday, March 7, 2018.   The presentation is on 'Winter Fly Fishing'.  This program covers the preparation needed for Winter Fly Fishing.  It includes wearing the proper apparel, the needed gear, what flies to use, and the techniques needed to be successful in the winter.  Learn how the behavior of trout changes in the winter months.  Doors open at 6:30 p.m. with the presentation at 7:00 p.m.  If you have any questions I can be contacted at pdinice@frontier.com .


Saturday, January 13, 2018

Paul's February 2018 Fly of the Month

The Usual


Hook:  Standard Dry Fly Hook.  Size #8 to #22.
Tying thread:   Fluorescent Orange 6/0 or 8/0 related to the fly size.
Tail:  Small bunch of hair from a rabbit’s foot pad.
Wing:  Larger bunch of hair from a rabbit’s foot pad.  Tied full as an upright clump, almost compara-style.
Body:  Under fur from rabbit’s foot.  Be sure to include some guard hairs to increase floatability.  Rabbit foots come in a variety of colors.  Grey/tans work great.  Also, I strongly recommend tying some up with a body of peacock herl. 
Head:  Tying Thread.

This is a mangy, scraggly, fantastic pattern. It originally appeared as a “Fly of the Month” over 25 years ago.  Recently, my local TU Chapter tied it at one of it’s Fly Tying Workshops.  It reminded me of how special and productive this fly can be.  It was developed by Mr. Fran Betters of Wilmington, NY.  He was also the inventor of the “’Haystack’ type flies which were the precursors to the ‘comparadun’.   

I’ve had such great luck with this fly over the years and tie them down to a #22.  I also tie them in size #8 and everything in between.  Why even the large size #8 ?   Well many years ago, HFFA member Max Ruggiero and I made the journey to Roscoe NY to fish the Beaverkill River for a week.   Late in the afternoons we would hit a ‘Green Drake’ hatch in a particularly slow section of the river.  The first afternoon we had very little luck landing fish during this hatch.  The trout had plenty of time to look at the flies that drifted by them and traditional green drake patterns were not working for us, or for any other fly fisherman on that section of the river.  My fly tying supplies on that trip were very limited but I did have a rabbit’s foot.  That first night I tied up a bunch of Green Drake sized Usuals.  Despite unusually long drifts, literally 3-4 minutes, Max and I did very well with that big usual pattern saving the day.

Here’s what I wrote about this fly more than 25 years ago.  Please note that back then I thought this fly could only be used to imitate sulphers, but it’s much more than that.  Change the colors to match the naturals on the water.

“This particular pattern is designed for emerging sulphers.  It has been particularly effective at dusk.  It gives the trout a very low profile on the surface.  Also, the orange thread shows translucently through the dubbed body when it hits the water.

Begin by wrapping the thread from the eye to approximately 2/3rds down hook.  1/3rd down the hook shank tie in a clump of pad hairs ‘comparadun’ style for your wing.  Measure the length carefully so that the wing is ‘mayfly sized’ when you stand it up.  Bring your tying thread in front of the wing and make wraps to stand it upright.  Next, tie in a clump of pad hairs for the tail.  Don’t be skimpy.  Remember the tail, and wing clump on top are the only means of floating the fly.  The tail should be approximately 2/3rds the length of the hook shank.  From the tail, dub the rabbit dubbing up the hook shank for the body.  Make sure to take 2-3 wraps of dubbing in front of the wing pad.  Tie and cut your thread off. 

This is probably the original rabbit’s foot emerger.  You will find that the pad hairs float the fly very nicely.  This fly is a double killer.  At the end of  your drift, try fishing it back wet with some twitches just below the surface.  Sometimes the fish can really zero in on this pattern and technique.  When I first started fly fishing I never fished this pattern much.  What a mistake.  If you are just learning to tie,  you can tie this pattern for virtually every hatch by simply matching the size and color of the natural.  A rabbit’s foot and dubbing can be purchased very cheaply.  You won’t have to mortgage your house purchasing expensive necks to imitate all the various may flies which can emerge throughout the course of the season.  As a searching pattern or during a caddis hatch, try substituting peacock herl instead of the white rabbit dubbing.”

Piscator Flies has a great instructional video on how to tie the Usual below:


If you have any questions about this fly or would like to submit a Fly of the Month I can be reached at 203 305-3850 or at pdinice@frontier.com .  This fly can also be viewed on my website at http://tightlinesflyfishing.blogspot.com/ .