Weight: (Optional)
Non-lead wire. You want to use
wire at a small enough gauge so as not to impact the profile of the fly.
Eyes: (Optional) Small black beadchain.
Bead: (Optional)
Color & size of choice.
Tail/shell
back: Squirrel tail in color of
choice. (I also substitute it with
peacock herl.)
Body: Yellow Chenille, antron yarn, dubbing. (You can make this fly any color you desire.)
Hackle: Brown saddle hackle.
This
is an extremely versatile fly. It can
represent a number of different insects, such as stone flies, hellgrammites,
and other large nymphs. The fly just
looks buggy! It was originally developed
as a Steelhead fly in Michigan by a man named Ron Spring. Also known as the ‘Pan Fish Wiggler’ and 'Michigan Wiggler’, this fly can be used to catch a variety of fish, including
steelhead, trout, small mouth bass, and pan fish. It can imitate whatever you want it to be and
is a fairly easy tie. Tie it from very
big sizes to size #10. My preferred
material for the body is yellow chenille, but I have used antron yarn and
dubbing.
To
tie this fly begin your thread behind the eye of the hook and wrap down to the
bend. Your going to tie in your squirrel
tail hairs for a tail. They should
extend about a hook gap length beyond the bend of the hook. (I also use peacock herl especially when
tying stonefly or smaller flies.) Do not cut off the tag end of the
squirrel. This will become your shell
back later. Next, tie in your
hackle. Now tie in your chenille or yarn
for the body. (You can also dub a body
of your preferred material.) End the
body behind the eye and tie/cut off your material. Next, wrap/palmer your hackle forwards and
tie it off behind the eye. Cut off the
tag end. Now bring your squirrel tail
forward to create your shell back. Make
sure you hold your shell back down firmly and tie it off. It has a tendency to loosen up and pull away
from the fly body. It’s important to
firmly hold it down as you tie it off.
Cut off the tag end of your squirrel shell back. Whip finish it off and apply head cement to
your wraps. I also apply some UV resin
on the shell back for extra durability.
No
matter what size wiggler you tied, or materials you used, you have a very buggy
and productive nymph. Last year the
small mouth fishing on the Housatonic was killer. Big nymphs seemed to be the most productive
way to catch them. This was a fly that
was very productive for me.
There is a nice video by ‘Panfish on
the Fly’ on how to tie one of the variations of this pattern below:
If
you have any questions about this fly or would like to submit a Fly of the
Month I can be reached at 203 305-3850 or at pdinice@frontier.com .
Body:3 strands of peacock herl or peacock ice
dubbing.
Collar/hackle:Brown hackle feather 1 size smaller than
the fly (size #16).
Secondary
collar:2-3 wraps of pink
ice dubbing.
Hotspot:red tying thread.
This
fly was developed by Mr. Lance Egan.Like
most nymphs tied on a jig hook, it sinks fast and gets down deep.Many anglers love to use this fly when
fishing ‘high water’.
Begin
by placing your bead on the hook and place it in your vice.Behind the bead, take 7-8 wraps of your wire,
break off the ends and push it up against the bead.You may want to further lock everything into
place with some super glue or adhesive of choice.Next, affix your thread to the hook shank and
make covering wraps along the hook shank.Leave your thread at the bend of the hook.Next, tie in your tail fibers of red saddle
hackle.The length of the tail should be
approximately the length of the hook shank.Now tie in your pearl tinsel rib.Next, tie in 3 strands of peacock herl.Wrap the herl forward leaving enough room for your collars & hot
spot.Tie & cut off your excess
peacock.Now, counter wrap the peacock
body with your pearl tinsel.Tie & cut
your tinsel off.Select a brown saddle
hackle 1 size smaller than the hook size (size #16).Tie the hackle in front of the peacock.Take two full turns of the hackle around the
hook.Preen the hackle fibers rearward
as you go.Tie & cut the excess
hackle off.Next dub a small amount of
pink ice dub for your secondary collar.2-3 wraps of a thin dubbing noodle is all that is needed.Now take some forward wraps with your thread
to create a red ‘hot spot’ adjacent to the bead.Tie & cut off your thread.Apply some cement to the hot spot wraps for
durability.
Tim
Flagler and tightlinevideo have a great instructional video on how to tie this
fly below:
If
you have any questions about this fly or would like to submit a Fly of the
Month I can be reached at 203 305-3850 or at pdinice@frontier.com .
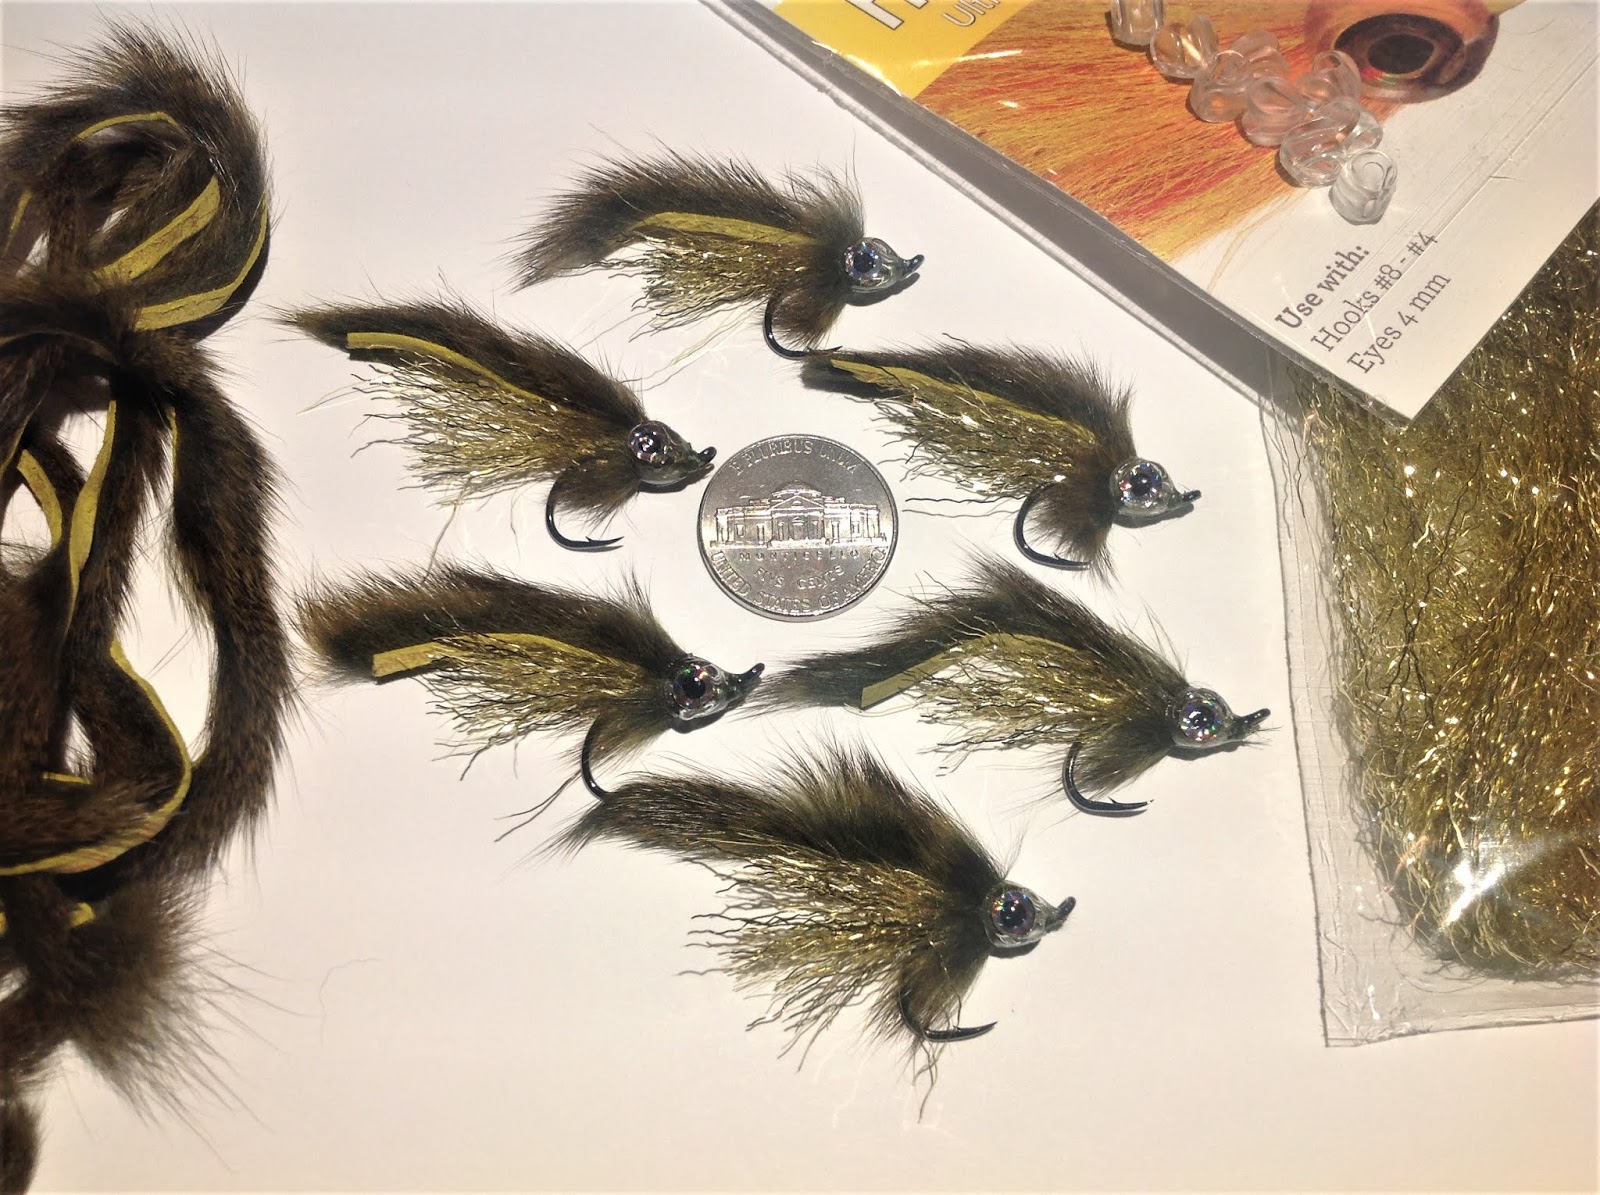
In
the age of big and gaudy articulated streamers, this pattern is an alternative
to try and represent smaller forage fish in rivers & streams.It was developed by Mr. Bob Reece of
Wyoming.He believes that this pattern is
very effective because of its tapered head and large eyes.These are predominant features of shiners,
chubs, & dace.I love fishing small
streamers.This is one of my go to
patterns that I’ve found to be very productive.You can tie it in a variety of colors.Olive is my preferred color.
Begin
by laying a base of thread from the hook eye to where it hangs evenly with the
hook point.Add a few drops of adhesive
and tie in a clump of Gold Ripple Ice Fiber.After is it is tied in, cut it to approximately 2 hook shank
lengths.Cut it on a 45 degree diagonal
from right to left.Next, tie in your
squirrel zonker strip.It should be
approximately 2 ½ times the length of the hook shank.It is tied in only by the tip of the
strip.Next, tie in a second strip of
squirrel zonker to be used as a collar.Before you tie it in, clip the tip at a 45 degree angle.That will provide you with an easier tie in
point and make wrapping your collar easier.Add a few more drops of adhesive and wrap your zonker forward to create
your collar.One or two wraps is all
that is needed.Tie off your zonker collar,
whip finish, and clip off your thread.You are now ready to place your fish mask and eyes onto the fly.The fly designer recommends gluing and
affixing the eyes on the mask prior to putting it on the hook shank.I use Fusion glue to cement the eyes in
place, then use a little light activated resin on them, with a final coat of
‘Tough as Nails’ for added durability.Add some adhesive on the hook shank behind the eye prior to gluing in the
mask.When you place the mask on the
hook shank, leave room in front of it for additional thread wraps to ensure it
is held in place.After you build up
wraps in front of the mask, clip and whip finish it off.Apply additional adhesive to the wraps.
Bob Reece
has an excellent instructional video on how to tie this fly below:
If
you have any questions about this fly or would like to submit a Fly of the
Month I can be reached at 203 305-3850 or at pdinice@frontier.com
.
Hook:Eagle Claw 254 SS or Eagle Claw L253 (Size #4
to #2/0 hook.)
Tying thread:Danville Flat Waxed Nylon, color of choice.
Wing:6-8 strands of Peacock Herl over Olive
Bucktail over Pearl Krystal Flash over Pink Bucktail.
Belly:White Bucktail.
Throat/Gill:Red Bucktail.
Eyes:3D Living Eyes sized to fly (I like to
oversize my eyes).
Finish:5 Minute Epoxy or UV Resin.
This
is an extremely versatile salt water fly.I’ve tied it on size #4 to #2/0 hook sizes.What’s important about this fly are the
various colors in the pattern recipe.The pink & olive color combo is a striper magnet.The fly also includes a flash lateral line, 3
D eyes, and a red ‘throat/gill plate’, all triggers that make this a very
productive fly.A few years ago I was on
the Cape and the fish were feeding on very small bait fish.I had tied up a bunch of Universals on a size
#4 hook (I also coated the body along the hook shank with epoxy) and landed
fish after fish when others failed to. This is a very easy and fast tie once you get
rollin’.No feathers to pair or mess
with.One additional comment about tying
this fly, sparse is better.
Begin
by laying a base of thread from the hook eye to the bend.Bring your thread back up to the eye.Tie in a sparse clump of pink buck tail
behind the hook eye.It should extend
beyond the bend at least 2 times the length of the hook shank.Next, in the same location. tie in a generous
amount of Pearl Krystal Flash just slightly longer than the pink buck
tail.For very small flies I’ve
substituted silver holographic tinsel for Krystal Flash.Next, top the flash with a clump of Olive
Buck Tail just slightly longer than the rest of the wing.Now, top it with 6-8 strands of Peacock Herl longer
than the length of the entire wing.Your
wing is complete.Don’t forget to
increase the durability of your fly by applying some head cement (or adhesive
of choice) as you tie it.
If
you have a rotary vice your going to rotate your fly to tie in your belly.On the opposite side of the hook where you
tied in your wing, your going to tie in a clump of White Buck Tail for the
belly.It should extend to the approximate
length of your wing.Remember not to
over dress the fly.You’re now going to
tie in your ‘throat/gill plate’ comprised of Red Buck Tail.It’s tied in just under the belly and extends
approximately a hook shank length under the belly.Finally, it’s time to tie in your 3 D living
eyes.Some like to use goop or zap-a-gap
to affix them.I prefer to stick them on
and then epoxy over them for additional durability.As always, feel free to experiment with this
fly.Try different flash materials or even
colors.One thing you want to do is tie
it in variety of sizes.
Dave Bitters of Baymen Charters has
an excellent instructional video on how to tie this fly below:
If
you have any questions about this fly or would like to submit a Fly of the
Month I can be reached at 203 305-3850 or at pdinice@frontier.com
.
Weight (Optional):6-8 wraps of lead free wire or a brass or
tungsten bead.
Collar:Gold Utra Wire, small(Or use color of choice.)
Tail:Speckld Golden Olive Coq de Leon fibers or
Pheasant rump feather fibers.
Body:Brown-olive rabbit-fur dubbing. (or
peacock herl or chenille).
Thorax:Brown-olive SLF dubbing.
Hackle:Speckled Golden Olive Coq de Leon Feather or
Pheasant rump feather fibers.
Head:Tying Thread.
Kudos
to my fly fishing friend Mike Lombardo for reminding me about this fly.I had tied it many years ago but alas, it’s a
forgotten fly in one of my boxes.So
glad he reintroduced it to me again.This pattern was originally developed in the Canadian West.It was created by a gentleman by the name of
Dr. Loyd A. Day of British Columbia back in 1925.It’s an old & traditional fly that works
both in still water & rivers.Although it can represent a variety of fish foods, it’s best known as a
damselfly & dragon fly imitation. Numerous material substitutions can be made to
tie this pattern.I’ve offered some of
these alternatives in the recipe above.When
tied in bright colors it’s a much used steelhead fly.
Begin
by starting your thread behind the eye of the hook.(If you so desire you can add weight to the
hook or slide a brass or tungsten bead behind the eye.)Wrap it to the bend of the hook.At the bend of the hook tie in approximately
6-12 Coq de Leon fibers (or use pheasant flank fibers) for your tail.The length of the tail should equal the
length of the hook shank.Next, tie in
your gold ultra wire rib.You’re now
going to dub your body of Brown-Olive rabbit-fur dubbing.Leave enough room behind the eye for your
Thorax and hackle.Bring and wrap your
rib forward to create an even segmented body.Tie & clip off the wire.Next, dub your Thorax with Brown-olive SLF dubbing.Next, select a Coq de Leon feather (or
pheasant flank feather) for your hackle.The fibers of the feather should be at least a hook shank in
length.Strip the bottom of the feather
stem before tying it in.Sweep the
fibers of the feather back and make two (2) wraps of the feather.Tie and cut the excess feather off.Create a finished bulbous head on the
fly.Cut your thread and apply head
cement.
As
previously stated you can make numerous material substitutions with this
pattern.A much used version has a body
made of peacock herl (see picture above).Another alternative
is to create the body by wrapping chenille.The variations & colors are endless.
Tight line has an excellent
instructional video on how to tie this fly below:
If
you have any questions about this fly or would like to submit a Fly of the
Month I can be reached at 203 305-3850 or at pdinice@frontier.com .
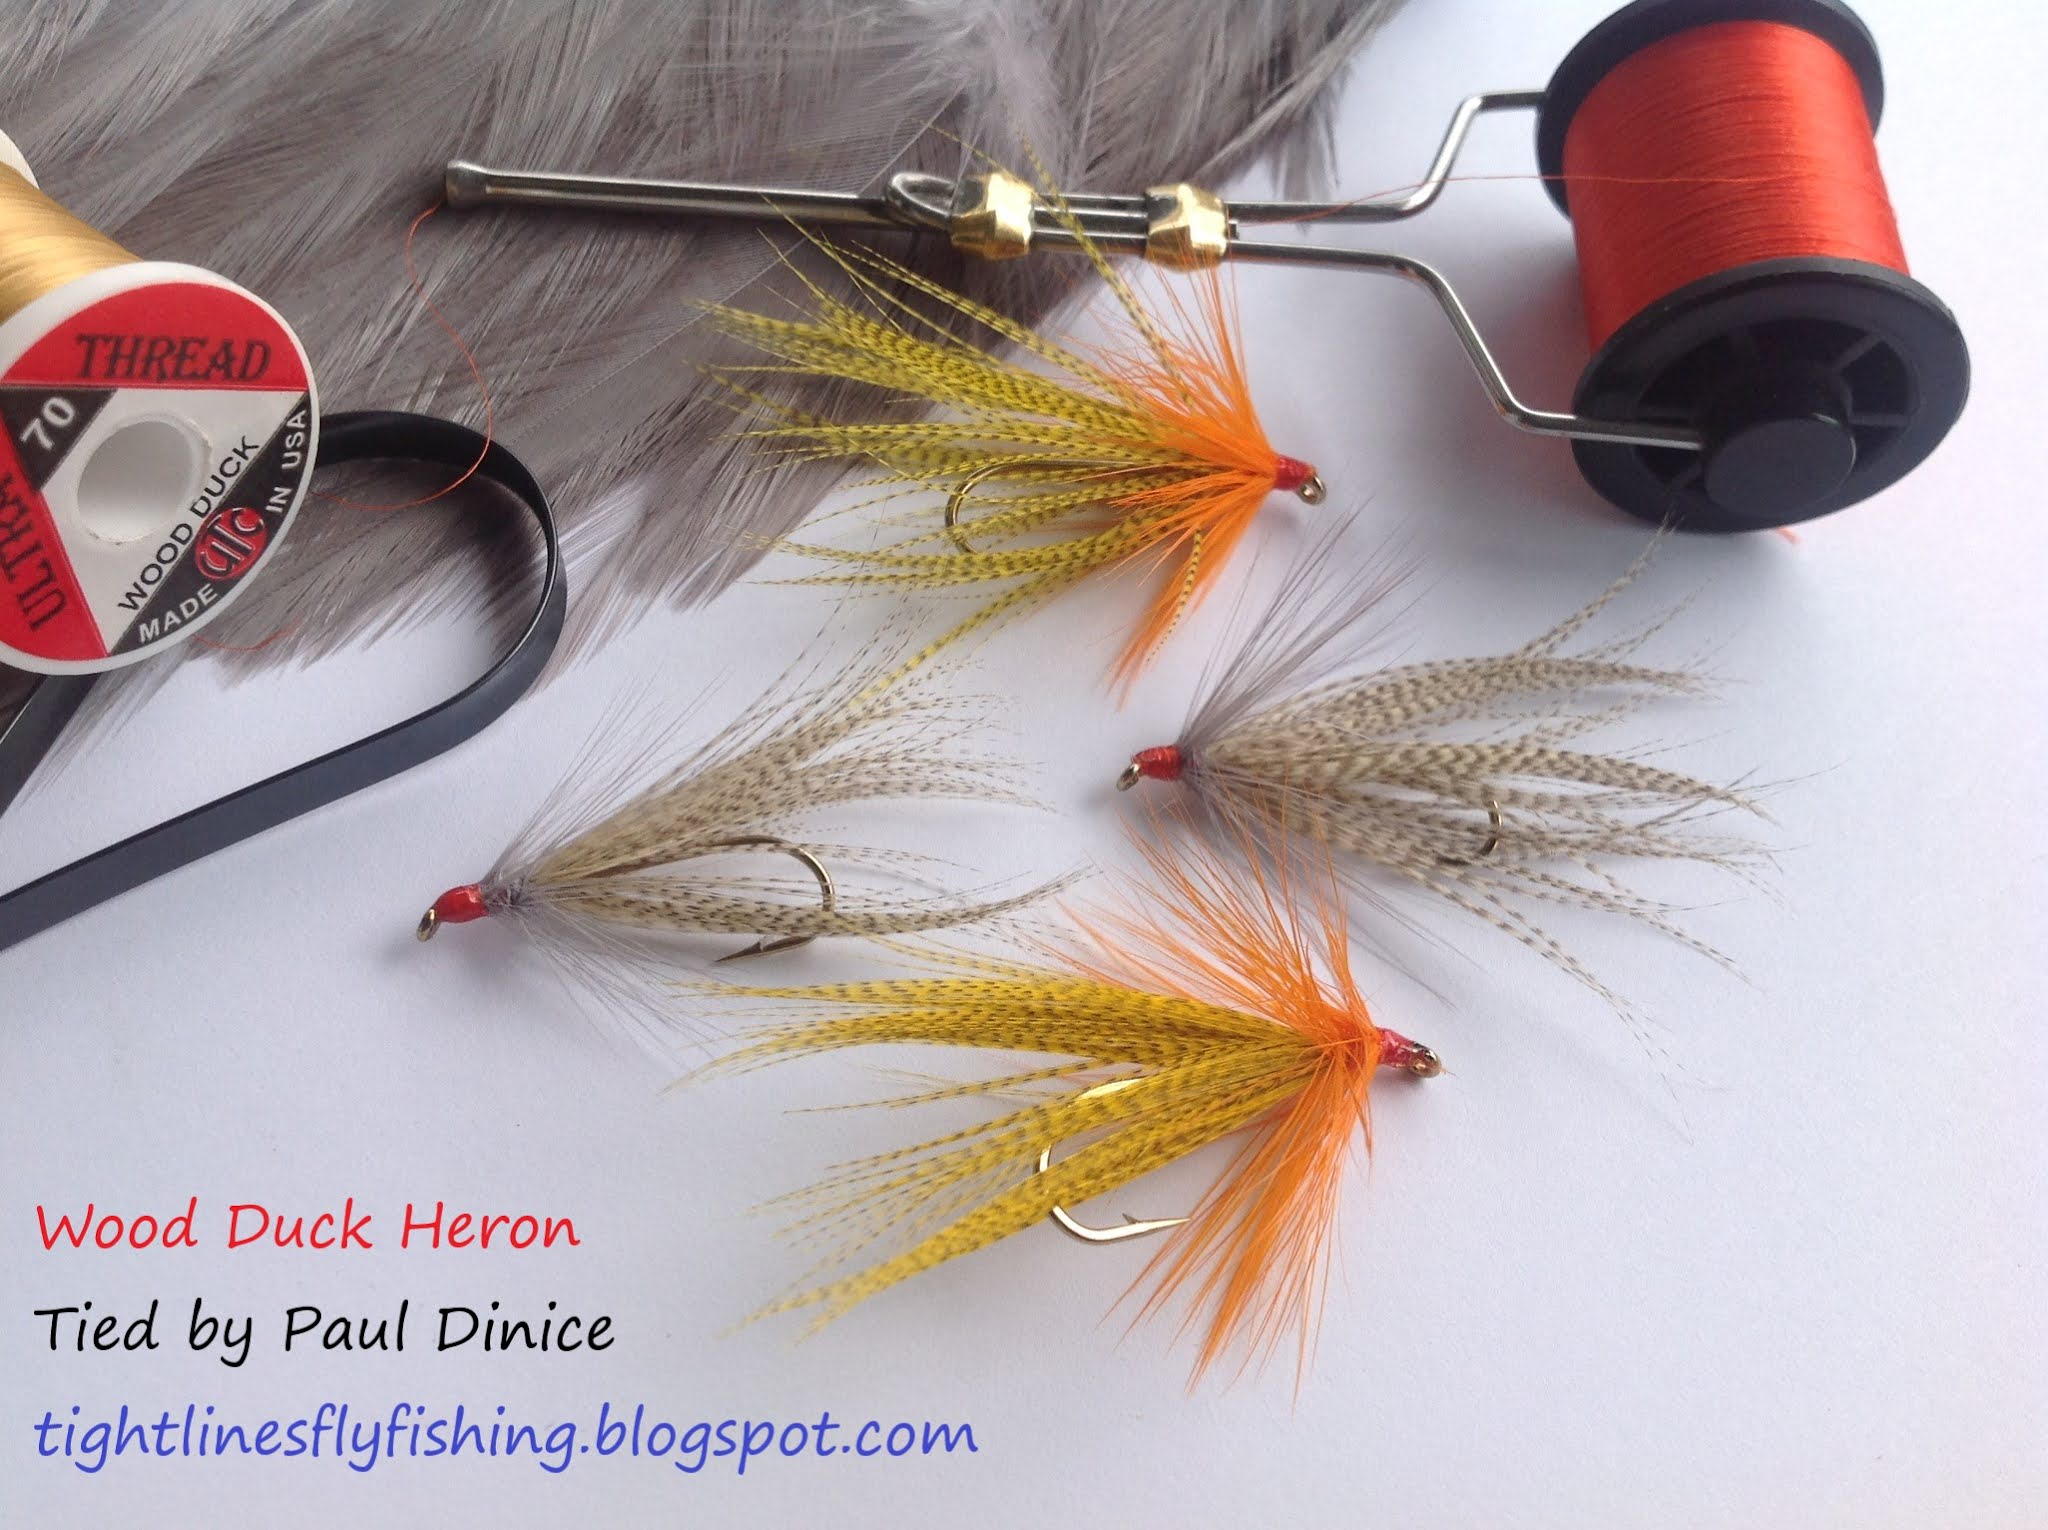
Hook:2X to 3X long Nymph/Streamer hook. (The size
of your wood duck will dictate your hook size.I usually tie mine on a Size #6 or #8 hook.)
Tying
thread:6/0 or 8/0
thread.Color of choice.(I usually tie mine with UTC wood duck or fluorescent
orange thread.)
Wing:Natural Lemon Wood Duck or
dyed imitation.
Collar:Light Dun Hen neck or saddle hackle.(Or use color of choice.)
This
streamer is a regional favorite of New Hampshire.It was originally developed by Mr. Nick
Lambou of Manchester, New Hampshire.Only 4 materials are needed to tie it, hook, thread, wood duck, &
hen hackle.A simple tie that really
produces.When tied with an Orange
collar it’s known as the Wood Duck & Orange, a particularly effective fly
for steelhead & land locked salmon, as well as trout.In the streamer age of ‘Bigger is better’
& ‘Articulated is best’, I’ll take this smaller traditional pattern any
day!
To
tie this fly, begin by wrapping your thread behind the eye to approximately the
half way point of your hook shaft.Make
sure the wraps are even.That will help
when your wood duck and collar are wrapped.Next select a wood duck feather.It should be long enough to extend about ½ hook shank length beyond the
bend.Your going to stroke the fibers of
the feather back and tie it in at the middle of the hook shank by the tip.Preen the fibers back so that both sides are
married and pointing back to the bend of the hook.With a set of hackle pliers palmer/wind the
feather forward, stroking back the fibers with your free hand as you go.Bring the feather forward and tie it off, but
make sure you leave room behind the eye for your collar. Next select a dun hen
feather to use for your collar.Just as
you did with the wood duck, stroke the fibers back and tie it in by the tip.Preen the fibers back so that both sides are
married and pointing back to the bend of the hook.With a set of hackle pliers palmer/wind the
feather forward, stroking back the fibers with your free hand as you go.You want to form a nice collar.It should take 4-5 wraps.Now, tie off and clip the feather.Next, form a neat head with your thread
behind the eye.Apply some head cement
& your ready to fish your creation.
Below is an excellent video on how
to tie this fly from Stone River Outfitters:
If you have any questions about
this fly or would like to submit a Fly of the Month I can be reached at 203
305-3850 or at pdinice@frontier.com .
Hook:Nymph hook; or curved nymph hook of choice
size #12 to #18.
Bead:(Optional) Gold bead or bead of choice to
match the size of hook.
Tying
thread:Black 8/0 thread.
Tail:Dyed Black Pheasant tail fibers.
Rib:Copper - small wire.I like to use red wire.
Abdomen:Wrapped Pheasant tail fibers.
Thorax/neck:Red Holographic Tinsel.
Hackle/legs:Dyed Black Partridge or Dyed Black Hen Hackle.
This
is yet another variation of a pheasant tail nymph.The advances in fly tying materials in recent
years is truly remarkable.You can
easily purchase Pheasant Tail Feathers dyed in a variety of colors.Although this pattern is effective all year
long, it is deadly when if it is fished during the ‘early black stone hatch’ in
late winter and early spring.You can
tie this fly on a curved nymph hook, with or without a bead, and with Partridge
or Hen for the hackle.
To
tie this fly, begin by wrapping the shank of the hook with your thread.(I have also tied this pattern with a bead
and more as a deep water nymph.)Tie in
three (3) Pheasant tail fibers for the tail.They should be roughly a hook shank gap in length.Tie in your small copper wire rib.Next, depending on the size of the fly, tie
in 2-4 more pheasant tail fibers by the tip.Wrap them forward approximately 2/3rds down the hook shank to form the
abdomen.Tie and clip the excess
off.Counter rib your fly with the
wire.Tie and clip it off.Next, for your hot spot, tie in your
Holographic Red Tinsel.You are going to
wrap the tinsel to create a ‘hot spot’ on your fly.To increase durability, you may want to dab a
drop of head cement to the hook shank prior to wrapping it.Give the tinsel 3 turns around the hook
shank, then tie and clip it off.Between
the ‘hot spot’ and the hook eye (or bead) there should be enough room to tie in
and wrap your hackle.If I want a
traditional wet fly profile I use Partridge.For smaller or nymph type variations I use Hen Hackle.After tying in your hackle of choice, take
2-3 wraps around the hook shank, stroking the feather fibers back while your
wrapping.Tie and clip the hackle
off.Whip finish your fly and apply some
head cement.
There
is an excellent video on how to tie this fly which was posted By Mak below:
If
you have any questions about this fly or would like to submit a Fly of the
Month I can be reached at 203 305-3850 or at pdinice@frontier.com .