Sunday, March 26, 2023

Paul's April 2023 Fly of the Month

 Woodchuck Caddis


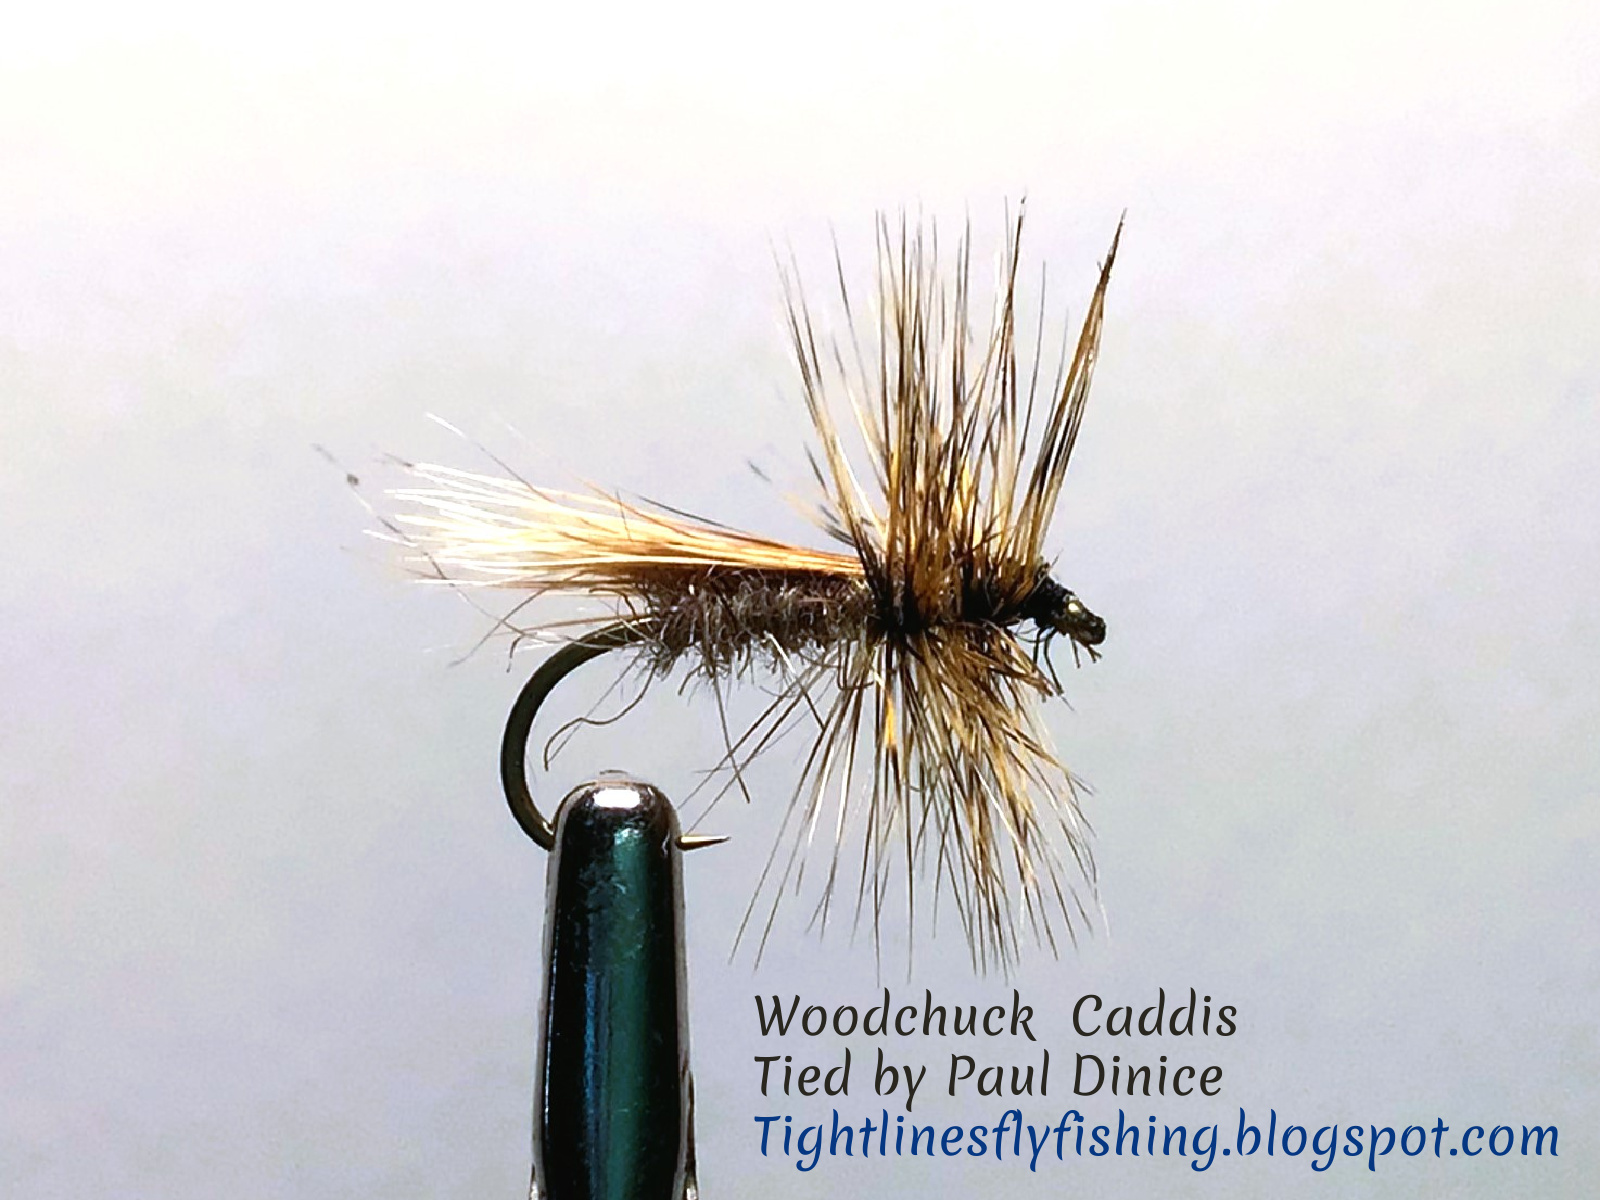
Hook:  Tiemco 100 Or Dry Fly Hook of choice; in Size #12 to #18.  

Thread:  Tan, Brown or Wood Duck colored thread.

Body:  Woodchuck under fur; or Natural Hare’s Ear dubbing mixed with Woodchuck under fur.  You may even be able to find Woodchuck dubbing.

Wing:  Woodchuck guard hairs.

Hackle:  Brown and Grizzly; or a single Cree; or dark-barred Dun Hackle.  

Eric Leiser is credited with having popularized this fly.  He included it in his book ‘The Book of Fly Tying Patterns’.  It’s a pretty easy tie and you can knock a lot of these flies fast.  It requires only 3 all natural materials.  This fly has been around for a while.  I have to thank my friend Bill Goeben for introducing it to me more than 35 years ago.  

To tie this fly, secure the hook in your vice.  Start your thread on the hook shank leaving a 2 hook eye length space behind the hook eye.  Take a few securing wraps ‘rearward’ then cut off the tag end.  Wrap rearward so that your thread hangs at about the hook point.  Next, create a slender dubbing noodle with your Body dubbing of choice.  Start dubbing the hook shank at the bend and make ‘touching’ wraps forward to the initial tie in point.  You are now going to prepare your wing by clipping a small clump of Guard Hairs off of the Woodchuck hide.  Pull away the shorter ‘underfur’ from the Guard Hairs.  You can use it for Body dubbing if you want.  Take the Guard Hairs and place them ‘tips first’ into a hair stacker.  Stack the hairs then measure them on top of the hook shank.  It should extend slightly beyond the back edge of the hook bend.  Hold the hairs tightly and make securing wraps forward.  Now lift the butt ends of the hairs off and trim them off.  Continue making securing wraps forward to the hook eye.  Bring your thread back to the initial tie in point. 

Select a Brown and Grizzly hackle for the fly.  A Cree or dark-barred Dun Hackle will also work.  Strip the fuzzy base feather fibers.  Now lay the feather on the near side of the hook.  The feather fibers should be forward beyond the hook eye and the stem will lay the hook shank.   After it is securely anchored, cut off the butt end of the feather and create a secure base for your hackle.  Leave your thread at the initial tie in point.  Now, wrap your hackle back to your thread with your pliers.  Take a few securing wraps around your hackle feather.  You are now going to make ‘touching’ wraps forward, carefully making counter wraps through your hackle, all the way to the hook eye.   Whip finish the fly, then cut off the butt end of  your hackle feather and your done. 

Below is a video by tightlinevideo on how to tie this fly:


If you have any questions about this fly or would like to submit a Fly of The Month I can be reached at  pdinice@frontier.com .

Friday, March 10, 2023

Paul's March 2023 Bonus Fly of the Month

 Krap Nymph


Hook:  1x long nymph hook Size #14 & 16. 

Thread:  6/0 Tan.

Bead:  Copper Tungsten Bead Sized to match hook.

Weight:  (Optional) 8 to 10 wraps of .025 Lead.

Tail:  Olive-ish, Brown or Red-ish Krap Dubbing.

Rib:  Small Copper, Gold, or Red Wire.

Body:  Olive-ish, Brown or Red-ish Krap Dubbing.

Thorax:  Olive-ish, Brown, Red-ish or Black-ish Krap Dubbing. 

Wing Case:  (Optional) Black or clear Bug or Nymph Skin; Coated with UV Resin.

Hot Spot:  (Optional) Wraps of Red, Orange, or Chartreuse Thread

This nymph is gnarly, buggy, and an easy tie.  I don’t usually post flies of the month with a very specific material.  This dubbing material is made by Fly Tyers Dungeon.  It’s a conglomeration of every wet fly dubbing you can think of.  There’s rabbit hair, ice dub material, and a lot of squiggly little bug legs in the mix.  I’ve had great luck with this fly.  You don’t have to purchase it from FTD (although their prices are super reasonable, they are great to deal with, and are super fast with your order).  If you don’t order the material from them, as a tyer, what you should do, is experiment with, and field test, different dubbings that you mix up yourself.  I tie this nymph in Olive, Brown, and with a Red tint. All these colors work.

To tie this fly begin by placing your bead on the hook.  Next, take 8-10 wraps of lead around the hook shank.  Push the wraps tight against the bead.  Trim off the butt ends of the lead wire.  Start your thread immediately behind the lead wraps to lock them in place.  Then, cover the lead and wrap your thread down to the hook bend.  Try to shape your thread wraps to create a tapered underbody.  Now tie in your Wire Ribbing.  I usually tie mine onto the far side of the hook.  I find it helps  prevent the first wrap of ribbing fowling the tail of the fly.  Next, form a thin dubbing noodle with your dubbing.  Dub the first 2/3rds of the fly.  Now wrap your ribbing forward to create a segmented body.  Tie it off with your thread and ‘helicopter’ the wire butt end off the hook shank.  Next, dub your thorax.  End and whip fishing your thread behind the bead.  If you like, you can create a ‘hot spot’ with wraps of Red, Orange, or Chartreuse thread.

A video by FTD on how to tie the Krap Nymph, is shown below:   


The website for Fly Tyers Dungeon is https://www.flytyersdungeon.com/index.htm  

If you have any questions about this fly or would like to submit a Fly of The Month I can be reached at pdinice@frontier.com .

Sunday, February 19, 2023

Paul's March 2023 Fly of the Month

 Weamer Fly


Hook:  Mustad 34007 Size #2/0 hook. 

Thread:  Big Fly White or heavy thread of choice.  Mono Thread used to bind down the eyes.

Eyes:  Mylar ‘Stick On’ eyes.

Flash:  Pearlescent or Silver Holographic Flash.

Hackle/Body:  White Marabou.

Wing:  Olive-Grey Bucktail (I also tie this in Chartreuse).

Head:  Built up with thread.  UV Resin over head & eyes.


This fly is called the Weamer because it’s a combination of a wet fly & streamer.  The fly was developed by a fly fisher named Peter Charles. I think this is one of the easiest Saltwater flies I tie and fish.  You can knock out a lot of these very fast.  It only has 3 materials.  Marabou, Bucktail, and Flash.  Size it to match any bait. 


To tie this fly, start your thread behind the hook eye and using touching wraps, cover the first 1/3 of the hook shank.  Cut off your tag end.  Next, tie in your marabou by the tip where your thread ends.  The originator of this fly likes to strip one side of the feather to make it easier to wrap around the hook shank.  Once tied in you can stroke and tie the tip back towards the rear of the fly.  Now, carefully wrap the feather in place, stroking the fibers rearward as you do this.  If you have a rotary vice it can help you with this step.  The first few wraps are critical because of the delicate nature of the marabou tips.  Once you are done wrapping it and down to the ‘butt’ end, take 3 wraps of thread over the butt to secure the marabou to the hook shank.  Cut off the butt end and wrap slightly back on the feather fibers to enhance it’s durability. 


Next, tie in your flash over the Marabou Body.  I like to tie in 3-4 strands of Pearlescent (Lateral Line) and 3-4 strands of Holographic Silver.  It should be longer than the Marabou body to match the wing you’re going to place on top of it.  After building up your head to the desired size, whip finish and tie off your White Thread.  Affix your mono thread to the head.  Tie in your Olive-Grey Bucktail wing.  It should extend 1 hook shank length beyond the bend.  After it’s secured, affix your Mylar Eyes on each side of the head.  You can help secure them with a couple wraps of your Mono Thread.  Tie your thread off and whip finish.  Apply your UV Resin to the head & cure it.  If desired, you can apply a coating of ‘hard as nails’ as a finishing coat.

There is a great video on how to tie this fly by hooked4lifeca (Peter Charles) below:


If you have any questions about this fly or would like to submit a Fly of The Month I can be reached at pdinice@frontier.com .

Monday, January 30, 2023

Paul's February 2023 Bonus Fly of the Month

 Slim Grizzly Nymph


Hook:  Firehole Sticks 718 Size #14.

Bead:  3 mm Gold Tungsten bead.

Tying Thread:   UTC 70 Denier Olive Thread.

Rib:  Ultra Wire Sculpin Olive Brassie Size.

Body:  Peacock Krystal Flash.

Fly Back/Tail:  Pheasant Tail Fibers.

Wingcase: Nymph Skin.

Legs:  Olive Grizzly Hackle.

Thorax:  Olive Brown Ice Dub

Finish:  UV Resin

This is a great all round nymph.  Tied in smaller sizes it’s a great imitation for Olive May flies. 

To tie this fly start your thread behind the bead.  Making some securing wraps of thread (8-10), advance your thread ¼ down the hook shank.  Cut off the butt end of your thread.  You are now going to tie in your Wire Rib.  After you secure it, wrap down the hook shank to the bend creating a slim even profile.  Bring your thread back up behind the bead.  Next, tie in 2 pieces of Peacock Krystal Flash.  Wrap them down the hook shank similar to the fly rib.  Now bring your thread back up behind the bead to your original tie in point.

Wrap your Krystal Flash body material forward with ‘touching’ wraps.  Tie it off at the original tie in point and cut off the butt end.  Next, prepare 5-6 Pheasant Tail Fibers for your fly back and tail.  Tie them in with the tips rearward at the original tie in point.  Guestimate the length of the tail, keeping all the fibers on top of the hook shank.  Now wrap your rib forward while making sure the Pheasant Fibers remain on top.  Tie the rib off at the original tie in point and ‘helicopter’ off the butt end.  Trim off your excess Pheasant Fibers. 

Next tie in your Nymph Skin wing pad.  The fly thorax size behind the bead should be approximately a ‘bead length’.  Your wing pad should lay rearward.  With your thread create a smooth base for your thorax.  Now tie in your Olive Grizzly Hackle legs by the butt end of the feather.  Dub your Ice Dub thorax leaving your thread behind the bead.  Palmer your hackle forward and tie it off behind the bead.  Usually, 2 ½ to 3 wraps of hackle is all that is needed.  Clip off the remaining portion of feather.  With your scissors trim off the hackle on the top of the fly.  Now bring your ‘wing pad’ forward and tie it off behind the bead.  Clip off the excess material.  Whip finish and cut off your thread.  Place a drop of UV Resin on the top of your wing pad.  Cure it with your UV light and your done. 

The Fly Fiend has a great video on how to tie this fly Below:


If you have any questions about this fly or would like to submit a Fly of The Month I can be reached at pdinice@frontier.com .


Thursday, January 26, 2023

Paul's February 2023 Fly of the Month

 Zirdle Bug


Hook:  Umpqua X Series XT500 Size #10. 

Bead:  Black Slotted Tungsten Bead 3.8mm 5/32”.

Thread:  Danville’s Tan Flat Waxed Nylon.

Tail/Wing:  Natural Pine Squirrel Zonker.   

Body:  Brown/Yellow Stonefly Chenille.

Legs:  Tan Life Flex.

Collar: (Optional) UV Brown Ice Dub.


Yet another small streamer with Pine Squirrel Zonker.  Flies like this are just ‘killers’.  Even if you do not tie the Zirdle Bug, here is what you want to learn from this pattern recipe – TIE SOME OF YOUR FAVORITE STREAMER PATTERNS ON A JIG HOOK!  They sink fast and fish inverted with an exceptional jigging action.  You can fish them as an anchor on your nymph rigs, with less bottom snags.  This fly can represent a variety of trout food including crayfish, sculpins, hellgrammites, and stone flies.  A great fly to dead drift and catch a lot of fish!  The material list above is to tie the Zirdle in natural colors.  Tie it also in Black, Purple, and especially in Brown & Olive.

To tie this fly place your slotted bead on your hook and place it in the vice.  Begin your thread behind the bead and wrap down to the bend with touching wraps.  Next, prepare your cheneille to be tied onto the rear of the hook shank by striping some of the material from the center ‘core’ with your fingernail.  This will give you a nice piece of thread to bind down your chenille.  Once it’s secured, advance your thread 2/3rds up the hook shank.  Tie off your chenille, then sweep back the ‘butt’ end rearward.  You are now going to tie in your rubber legs.  You need 2 pieces approximately 4 times the length of the hook shank.  (You will trim them evenly later.)  Tie one section on one side of the hook shank, and the other section on the opposite side of the hook shank.  They should extend ‘up’ from the hook shank.  Next, take your body material and take one wrap between the middle of both legs and one wrap in the front behind the bead.  Tie it off behind the bead, cut off the butt end, and whip finish the fly, but don’t cut your thread.  It should look like a Pat’s Rubber Legs without the tail.    

Now, prepare your Squirrel Zonker Strip for the fly.  Invert your hook and measure the Zonker against the fly.  The Zonker Strip will be pierced by the hook at the rear of the fly.  It will also be affixed behind the bead with your thread.  Your tail should extend approximately 2-3 times the length of the hook shank, but it’s really a matter of personal preference.  You can mark the Zonker with a sharpy or ‘eye-ball’ it for length.  Remove your hook from the vice and pierce the Zonker with the hook.  Adjust it so that it will lay flat on your fly body.  You should have some excess Zonker that extends beyond the bead.  Trim those hairs off the hide to establish a flat tie in point for your thread.  Take some securing wraps to bind down the Strip behind the bead.  Trim the excess Zonker hide.  You can whip finish the fly if you so desire, but I like to dub a little collar with Ice Dub.  Finally, whip finish your fly and cut off the tag end of thread.

There is a great video on how to tie this fly by Mosseycreekflyfishing below:


If you have any questions about this fly or would like to submit a Fly of The Month I can be reached at pdinice@frontier.com .


Sunday, January 1, 2023

Paul's January 2023 Bonus Fly of the Month

Roamer Fly


Hook:  Allen SW002 Size #2 Hook or Mustad 34007 Size #2 hook. 

Thread:  Uni-Thread White.

Weight:  8 Wraps of lead wire at the rear(bend) of the hook.

Tail:  Clump of Bucktail at the rear of the hook, over which is a few strands of pearlescent flash.

Outer Tail:  Two Grizzly hackle feathers.

Inner Wing:  White Bucktail half the length of the tail, over which is Olive Lazer Dub.

Body:  Large Olive Polar Chenille. 

Collar:  Reverse Tie in White Bucktail then sweep back.

Throat:  Red Krystal Flash under hook eye.

Head:  Two clumps of Olive Lazer Dub on top.  Two Clumps of White Lazer Dub on the bottom. Combed back towards the rear of the fly.

Finish:  Epoxy, UV Resin, or 2 coats of Fingernail Polish.

This fly was developed by a tyer named Jake Villwock.  It moves a lot of water.  Tie it in dark or black colors for nighttime fishing.  You want to use it to search for the big boys.  The weight on this fly is in the rear.  It wobbles and jigs a little differently than if the weight was in the front.

To start this fly lay down 8 wraps of lead at the rear (bend) of the hook.  Start your thread behind the wraps and wrap on both sides of it to anchor it securely. Coat and cure the wraps with UV adhesive.  Tie in a clump of White Bucktail at the rear of the hook.  After a couple of wraps press the butt end with your fingernail to make sure it surrounds the hook shank.  It should extend 1 ½ hook shank length beyond the bend.  Top the Bucktail with a few strands of Pearlescent Flash of choice.  Next, pair up and tie in Two Grizzly hackle feathers, one feather on each side of the hook shank.  They should extend the length of your tail.  On top of this tie in another clump of White Bucktail.  It should extend approximately ¾ length of the tail.  Again, press it with your fingernail so that it surrounds the hook shank.  Now tie in a clump of Lazer Dub.  Roll the clump between your fingers, tie it in at it’s mid-point, then sweep all the fibers rearward.

Next, tie in your Polar Chenille.  Palmer it forward until it’s 2 hook eyes back from the front of the fly.  Next, reverse tie in a clump of White Bucktail.  When swept back it should extend to the end of your Lazer Dub Wing.  Now tie in your Throat of Red Krystal Flash under the hook eye.  To create the head, tie in 4 clumps of Lazer Dub behind the eye.  You can use a darker color on top if you like.  Tie the clumps in at their midpoint and sweep all the fibers rearward.  Take thread wraps in front of the Lazer Dub/head.  Whip finish the fly.  Comb and stroke the Lazer Dub fibers rearward. Finish the fly by applying head cement or UV Resin on your front wraps. 

Allen Fly Fishing has a great video on how to tie this fly below:


If you have any questions about this fly or would like to submit a Fly of The Month I can be reached at pdinice@frontier.com .

Sunday, December 25, 2022

Paul's January 2023 Fly of the Month

 Duracell Nymph


Hook:  Fulling Mill Jig hook or Jig hook of choice, Size #12. 

Thread:  8/0 Camel or Wood Duck Thread.

Bead:  Silver Nickel Tungsten Bead 3.3 MM or sized to match hook.

Tail:  Coq De Leon Fibers, Dyed Brown.

Rib:  UTC Ultra Small Red Wire.

Body & Thorax:  Ice Dub UV Brown.

Collar:  Brown CDC Fibers spun in a dubbing loop. Finished with 2-3 addition thin wraps of Brown UV Ice Dub behind the bead. 

I’ve had great success fishing with this fly throughout the entire season.  Also, if you fish the TMA’s here in CT, sometimes the trout acquire ‘gold-bead-itis’.  A fly with a copper, silver, rainbow, or alternative color can sometimes make a difference.  This is perhaps my best producing ‘silver’ bead fly.  And boy does it sink with the Ice Dub material.  Although there are not many materials needed for the Duracell, it is not an easy tie.  It’s very difficult to form a slender dubbing noodle with Ice Dub.  The material very hard to tame.  I recommend using some tying wax and you might even want to moisten your fingers.  There are also some special tools(clips) available to help form your CDC Collar dubbing loop.  That should help to make tying this fly easier for you.


To tie this fly begin by placing your bead on the hook and hook in the vice.  Start your thread behind the bead, take a few securing wraps, cut off the tag end and wrap down to the bend of the hook.   Next, strip & prepare 5-6 fibers of Coq De Leon fibers to tie in for your tail.  They should be approximately a hook shank in length or shorter depending upon your preference.   After you have secured them, cut off the butt ends, then tie in your Red Wire Rib.  I usually tie it in behind the bead and wrap back down to the bend. 


Next, dub a body & thorax of Ice Dub UV Brown.  Dub a tapered body ending just behind the bead, then back off your thread a turn or two.  Now wrap your wire forward to create a segmented body.  Tie it off with your thread and ‘helicopter’ the wire butt end off the hook shank.  Prepare your CDC feather fibers and dubbing loop.  There are commercial tools that can help you do this. I use a household plastic clip to hold the fibers clipped from the feather. I then bring the clip with the fibers to my dubbing loop and spin it.  Now wrap your CDC Dubbing loop around the hook shank 3-4 times, stroking the fibers rearward as you do so.  This should create a nice ‘wet fly’ type collar.  Tie and clip off the remaining loop. Finally, apply a small dubbing noodle of Ice Dub behind the bead.  This will help train your CDC Collar fibers to flow rearward.   Whip finish the fly and you’re done. 

Fly Fish Food has a great video on how to tie the Duracell Jig Nymph below:


If you have any questions about this fly or would like to submit a Fly of The Month I can be reached at pdinice@frontier.com .